
Caramel apple slices are a delightful twist on the classic caramel apple—easier to eat, quicker to make, and endlessly customizable. Whether you’re prepping a festive platter for a party, crafting a sweet after-school snack, or looking for an easy no-bake dessert, these apple slices with gooey caramel coating deliver just the right combo of crunch, sweetness, and nostalgia. In this post, we’ll walk you through the perfect caramel apple slices recipe, give you storage and serving tips, troubleshoot caramel issues, and offer fun variations.
Don’t miss our homemade caramel apples recipe if you love the classic version too!
Why You’ll Love This Caramel Apple Slices Recipe
Sweet Meets Simple: A Crowd-Pleaser You Can Whip Up Fast
Caramel apple slices are the best of both worlds—juicy, tart apples and creamy, buttery caramel. But unlike traditional whole caramel apples, these slices are way easier to serve and enjoy. No sticky faces. No carving. Just sweet, crisp bites that feel like autumn on a stick.
Kid-Friendly, Party-Ready, and Picnic-Perfect
Because they’re sliced, they’re portioned perfectly for little hands. Whether it’s for Halloween parties, bake sales, or family movie night, caramel apple slices are always a hit. Plus, they travel well and stay fresh with a few simple tips (more on that later!).
Versatile and Customizable
Want to dress them up? Dip your caramel apple slices in crushed pretzels, mini chocolate chips, crushed Oreos, or chopped nuts. Want to go sugar-free? Use our sugar-free caramel syrup recipe for a healthier twist.
No-Bake and Time-Saving
You don’t need to turn on the oven or fuss with candy thermometers. This is the kind of recipe that looks gourmet, but anyone can make it in under 20 minutes. That’s a big win for busy weekdays or last-minute events.
Tastes Like Fall, Feels Like Nostalgia
That soft caramel layer over cool, crisp apples is more than a dessert—it’s a bite of childhood memories. Apple picking, flannel shirts, hayrides… every slice brings it all back.
Preparation and Cooking Time for Caramel Apple Slices
Quick Prep, Big Flavor: How Much Time You’ll Need
One of the best things about caramel apple slices is how little time it takes to bring them together. From start to finish, you’re looking at about 15 to 25 minutes—and that includes washing, slicing, melting, dipping, and decorating. There’s no oven involved, no baking trays, and no need to chill overnight. Just grab your apples and go.
| Step | Time (Approx.) |
|---|---|
| Washing & slicing apples | 5 minutes |
| Melting caramel | 5 minutes |
| Dipping & decorating | 10-15 minutes |
| Optional chilling | 5 minutes |
These times are flexible depending on how many you’re making. Whether you’re prepping 4 slices or 40 for a party platter, the workflow is the same.
Perfect for Last-Minute Treats or Planned Events
Running late for a potluck? Hosting a game day snack table? Caramel apple slices are the kind of no-fuss dessert that can be prepped in advance or just before serving. They’re as easy to whip up on a whim as they are to batch prep with the kids.
Check out this quick banana bread with cake mix if you’re building a fast-fix dessert board!
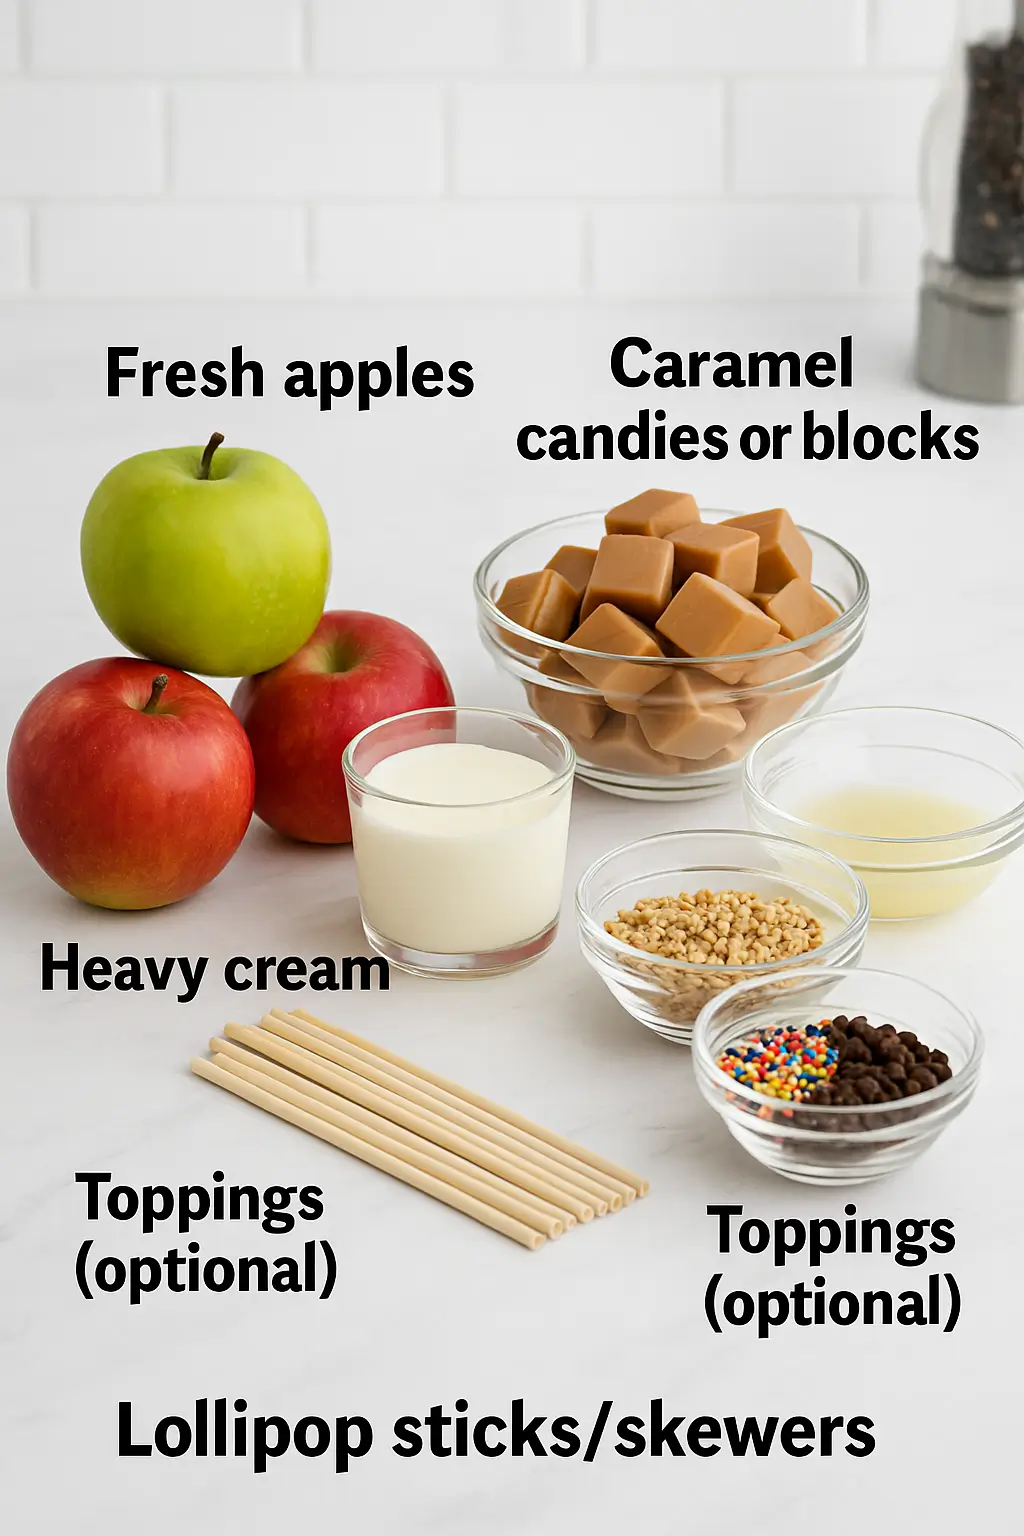
Ingredients for the Best Caramel Apple Slices
Must-Have Ingredients for the Classic Version
To make these delicious caramel apple slices, you’ll need just a handful of pantry staples. The quality of the caramel and apples will make a big difference, so choose wisely!
| Ingredient | Amount | Notes |
|---|---|---|
| Fresh apples | 3–4 medium apples | Granny Smith, Honeycrisp, Fuji or Gala |
| Caramel candies or blocks | 1 (11 oz) bag | Use high-quality soft caramel |
| Heavy cream | 2 tbsp | Makes the caramel silky and smooth |
| Lemon juice | 1 tbsp (optional) | Prevents apples from browning |
| Toppings (optional) | As desired | Chopped nuts, sprinkles, mini chips |
| Lollipop sticks/skewers | 6–8 | For easier dipping and holding |
Tip: If you’re short on time or prefer a softer drizzle, try using this sugar-free caramel syrup. It works beautifully for light coats.
Best Apples for Caramel Dipping
Not all apples are created equal when it comes to caramel coating. Choose apples that are:
- Firm and crisp (so they don’t get soggy)
- Sweet-tart to balance the rich caramel
- Fresh and wax-free for better caramel adhesion
Popular choices:
- Granny Smith: tart, bright, and classic
- Honeycrisp: naturally sweet and crisp
- Fuji or Pink Lady: a blend of sweet and tart
Looking for more fruit-based inspiration? Don’t miss our carrot apple salad for another refreshing snack idea.
Step-by-Step Instructions for Perfect Caramel Apple Slices
Step 1: Prep Your Apples
- Wash and dry apples thoroughly.
Store-bought apples often have wax coatings that prevent caramel from sticking. Scrub them with warm water and dry completely. - Slice the apples into thick wedges.
Cut each apple into 6–8 slices. Too thin, and they’ll collapse under the caramel. Too thick, and they’ll be hard to eat. - Optional: Dip slices in lemon water.
Mix 1 tbsp of lemon juice in a bowl of cold water. Let slices soak for 2 minutes to prevent browning. Pat them dry after.
Pro Tip: If caramel keeps sliding off, it’s likely because of moisture. Dry those slices well before dipping!
Step 2: Insert Sticks
Stick wooden skewers, lollipop sticks, or even sturdy toothpicks into the base of each apple slice. It gives you a good grip and makes them easier to coat.
Step 3: Melt the Caramel
- Use a saucepan or microwave.
Place unwrapped caramels and heavy cream in a microwave-safe bowl or saucepan. - Heat gently until smooth.
Microwave in 30-second bursts, stirring in between, or melt slowly on stovetop over low heat. - Stir until glossy and pourable.
The caramel should coat a spoon without running too thin. If it’s too thick, add a splash of cream.
Learn more about melting chocolate properly for a similar smooth technique!
Step 4: Dip and Decorate
- Dip each apple slice into warm caramel.
Hold it upright to let excess caramel drip off. - Add toppings immediately.
While the caramel is still sticky, roll or sprinkle your toppings of choice. Popular options include:- Crushed peanuts or pecans
- Crushed pretzels
- Mini chocolate chips
- Coconut flakes
- Crumbled cookies
- Place slices on a parchment-lined tray.
Let them sit at room temperature or chill for 5–10 minutes until set.
Step 5: Serve or Store
You can serve them immediately or store them for later (more on that in Part 8!). They’re best eaten the same day for max crispness.

Discover more indulgent dessert hacks like these cheesecake brownies for your next sweet table.
How to Serve Caramel Apple Slices
Make It a Showstopper on Any Dessert Table
Caramel apple slices are a visual and tasty delight, so presentation matters. Whether you’re plating them for family night or setting them out for guests, here are simple yet impressive ways to serve them:
- Arrange slices in a fan or spiral pattern on a large platter for a bakery-style display. Use a parchment or wax paper base to keep them from sticking.
- Serve with dipping sauces like chocolate drizzle, crushed peanut butter cups, or warm Nutella on the side.
- Use cupcake liners to separate individual slices on a tray. This keeps fingers clean and adds color to your presentation.
- Add name tags or ingredient labels if you’re serving a variety of toppings—especially helpful for kids or those with allergies.
Don’t miss our heavenly Boston cream pie cheesecake for another dessert table centerpiece idea.
Ideal Pairings for Any Occasion
Caramel apple slices fit into nearly any gathering or meal type. Here are some smart pairings:
| Occasion | Serving Idea |
|---|---|
| Fall party | Serve with hot apple cider or pumpkin dip |
| Kids’ snack | Pair with graham crackers or trail mix |
| Date night | Add alongside cheese cubes and dark chocolate |
| Dessert board | Mix with brownies, cookies, and mini tarts |
| After-school treat | Serve with peanut butter and granola clusters |
These juicy, caramel-covered bites blend wonderfully with sweet, salty, or creamy textures.
Serve Immediately or Slightly Chilled
You can serve these at room temp, but for best caramel hold and crisp texture, slightly chill them before serving—especially if it’s warm out. Just 5–10 minutes in the fridge is enough.
Looking for a refreshing bite too? Try this pineapple cucumber salad as a cool, sweet-salty pairing.
Additional Tips for Foolproof Caramel Apple Slices
1. Dry Your Apple Slices Like a Pro
Excess moisture is the #1 reason caramel won’t stick. After slicing, pat each apple slice completely dry with paper towels. Even better? Chill the slices for 10 minutes in the fridge before dipping—cold apples help caramel set faster and stick better.
Why isn’t my caramel sticking to my apple slices? Usually because of leftover moisture or wax coating. Scrub apples well and dry thoroughly before dipping.
2. Use the Right Caramel
Use soft caramels, not hard candy ones. Caramel baking bits or wrapped caramels like Kraft or Werther’s are great options. Add a little heavy cream or milk to loosen up the caramel for easier dipping.
Want to avoid added sugar? Check out our sugar-free caramel syrup for a lighter option.
3. Work Fast for Best Results
Caramel firms up quickly as it cools. Keep it warm during the dipping process by using a double boiler or setting your bowl over a pot of hot water. Don’t delay once the caramel is ready—dip and decorate right away!
4. Don’t Overload the Caramel
Dip no more than halfway up the slice. If you try to coat the entire thing, caramel will drip and slide. It also helps to let the excess caramel drip off before placing it on the tray.
5. Line Your Tray with Parchment
Caramel is sticky business. Use parchment or wax paper on your tray to prevent mess and ensure slices lift off cleanly once set.
6. Chill Slightly Before Serving
While caramel apple slices don’t require refrigeration, chilling them for 5–10 minutes after dipping helps the caramel set and stay put, especially on warm days.
Looking for more party-ready treats? You’ll love our mini peanut butter cup cheesecakes for bite-sized dessert options.
Recipe Variation Ideas for Caramel Apple Slices
Chocolate-Dipped Caramel Apple Slices
Take things to the next level by adding a chocolate layer after the caramel. Once the caramel sets slightly:
- Dip half the slice in melted semi-sweet or white chocolate.
- Let it drip, then lay it on a parchment-lined tray.
- Add a drizzle of contrasting chocolate or a pinch of sea salt for gourmet flair.
Discover great ideas like this in our chocolate hazelnut mascarpone cups for next-level flavor combos.
Caramel Apple Nachos
Skip the sticks and create a platter-style snack:
- Arrange apple slices flat on a plate.
- Drizzle warm caramel across the top.
- Sprinkle with crushed Oreos, chopped nuts, chocolate chips, or sprinkles.
This is a great option for parties or kids, and you can make it allergy-friendly easily by adjusting the toppings.
Candy Coated Variations
If you want to go all out, dip the slices in caramel and then press them into:
- Crushed pretzels (salty-sweet)
- Crushed graham crackers (pie-like flavor)
- Mini M&Ms or rainbow sprinkles (kid-favorite)
Dairy-Free Caramel Apple Slices
Use coconut milk or plant-based butter in place of cream and butter when melting caramel. There are also vegan caramel brands available if you want to avoid dairy entirely.
Add a Nut Butter Base
Before dipping in caramel, brush one side of the apple slice with peanut butter or almond butter. Then dip or drizzle with caramel. The result? A protein-packed, extra-decadent treat.
Looking for similar creative spins? Check out our lavender honey cupcakes for an elevated, floral-inspired dessert.
Freezing and Storage Tips for Caramel Apple Slices
Can You Store Caramel Apple Slices?
Yes—and no. While caramel apple slices are best enjoyed fresh, you can store them short-term with proper care. Here’s how to do it without turning them soggy or sticky.
Short-Term Storage (Up to 2 Days)
- Arrange slices in a single layer on a parchment-lined tray.
- Lightly cover with plastic wrap or place them in an airtight container.
- Refrigerate them to slow caramel melting and preserve crispness.
Important: Let them sit out for 5–10 minutes before serving to soften the caramel slightly.
Don’t miss our no-bake Oreo cake pops if you’re planning a fridge-friendly dessert tray!
How Far in Advance Can I Make Caramel Apple Slices?
You can prep them up to 24 hours in advance for the best texture and appearance. After that, the apples may start to sweat or lose their crisp bite. Avoid making them too early unless you’re storing for a short window.
Can You Freeze Caramel Apple Slices?
Freezing isn’t recommended. The caramel becomes brittle, and thawing causes the apples to release water, making them mushy and causing the caramel to slide off. If you must freeze:
- Wrap each slice in wax paper.
- Place in a freezer bag, then lay flat.
- Thaw uncovered in the fridge and blot excess moisture before serving.
Want a freezer-safe dessert instead? Try our muddy buddies—they’re the perfect make-ahead treat!
Quick Storage Tips Recap
| Method | Duration | Best Practice |
|---|---|---|
| Room temp | Same day | Keep uncovered, serve within hours |
| Fridge | 1–2 days | Store airtight, single layer |
| Freezer | Avoid | Texture and caramel quality declines |
Special Equipment for Making Caramel Apple Slices
You Don’t Need Fancy Tools—But These Help
One of the best things about caramel apple slices is how simple they are to make. Still, a few basic tools can make your process cleaner, quicker, and more enjoyable.
Must-Have Tools
| Tool | Why You Need It |
|---|---|
| Sharp knife | For slicing apples cleanly and evenly |
| Cutting board | Protects surfaces and makes slicing safer |
| Parchment paper | Keeps caramel from sticking to trays |
| Microwave-safe bowl | For melting caramel quickly |
| Wooden skewers/sticks | Makes dipping and serving easier |
| Paper towels | For drying slices completely before dipping |
Don’t forget: moisture = caramel disaster. Drying tools like paper towels are more important than they seem!
Optional but Helpful Gear
These extras aren’t required, but they’ll level up your experience:
- Apple slicer/corer – Speeds up prep time if you’re slicing multiple apples
- Double boiler or hot water bowl – Keeps caramel warm while dipping
- Small offset spatula – Great for spreading caramel or nut butter
- Cooling rack – Lets air circulate underneath for even setting
- Decorating squeeze bottles – If you’re drizzling chocolate or sauces for visual flair
Want to level up your kitchen game? Take a peek at our creamy coffee cheesecake where presentation tools make all the difference.
Clean-Up Made Easy
Caramel can get sticky fast. Clean tools right away by soaking them in warm soapy water before the caramel hardens. A little baking soda helps lift sticky residue from bowls or counters.
Frequently Asked Questions
How do you keep caramel from sliding off apples?
This is a super common issue. Caramel won’t stick to wet or waxy apple skins. To prevent sliding:
Scrub apples thoroughly to remove any wax.
Dry slices completely with paper towels.
Chill the slices for 10 minutes before dipping—cold apples help the caramel set faster and stick better.
Also, avoid overloading with caramel. A thin, even coat works best.
Will caramel stick to sliced apples?
Yes, if you follow proper prep! Slice your apples thick (about ½ inch), pat them completely dry, and chill before dipping. Caramel sticks well when apples are cold and dry—not when they’re warm or damp.
Pro tip: Use firm apple varieties like Granny Smith or Honeycrisp for the best results.
How far in advance can I make caramel apple slices?
They’re best made within 24 hours of serving. You can prep them the night before and store in the fridge in a single layer. Beyond 1–2 days, the apples start to brown or get soggy, and the caramel can separate.
What’s the difference between a candied apple and a caramel apple?
Great question! A candied apple has a hard, shiny sugar shell made with cooked sugar and corn syrup (like a lollipop). A caramel apple is coated in soft, chewy caramel that stays sticky and creamy. Candied apples crack. Caramel apples melt in your mouth.
Should apples be cold before dipping in caramel?
Yes! Cold apples help caramel adhere and set quickly. Room temperature or warm apples may cause the caramel to slide off or pool. Chill slices for 10 minutes before dipping, and you’ll get a perfect coat.
Why isn’t my caramel sticking to my apple slices?
The top reasons caramel won’t stick include:
Wet or waxy apple skin
Warm or moist slices
Too thick or too hot caramel
Solution? Scrub, dry, chill, and dip immediately once the caramel is ready. A little lemon juice on slices can also help prevent browning without affecting stickiness.
Still having trouble? Try this homemade caramel apples recipe to get back to basics and build confidence!
Connect With Us & Share the Love!
Love this recipe? Follow us on your favorite social platforms. We’d love to feature your bake!
📌 Save it, bake it, and share it—because food tastes better when it brings people together.
PrintCaramel Apple Slices

These easy caramel apple slices are the perfect no-bake fall treat. Sweet, crisp, and dipped in buttery caramel with your favorite toppings, they’re ready in minutes and perfect for parties, snacks, or dessert boards.
- Prep Time: 15 minutes
- Cook Time: 5 minutes
- Total Time: 20 minutes
- Yield: 6–8 caramel apple slices
- Category: Dessert
- Method: No-Bake
- Cuisine: American
- Diet: Vegetarian
Ingredients
- 3–4 medium apples (Granny Smith, Honeycrisp, or Fuji)
- 1 (11 oz) bag soft caramel candies
- 2 tablespoons heavy cream
- 1 tablespoon lemon juice (optional, to prevent browning)
- Toppings (optional): crushed nuts, mini chocolate chips, sprinkles, crushed cookies, coconut flakes
- 6–8 wooden skewers or lollipop sticks
Instructions
- Wash and scrub apples to remove wax, then dry completely.
- Slice apples into thick wedges (6–8 per apple). Optional: soak in lemon water for 2 minutes, then pat dry.
- Insert skewers or sticks into the base of each apple slice.
- In a microwave-safe bowl or saucepan, combine unwrapped caramel candies and heavy cream. Melt gently until smooth (microwave in 30-second intervals or use low heat on the stovetop).
- Dip each apple slice into the caramel, let the excess drip off, and quickly add your desired toppings.
- Place coated slices on a parchment-lined tray and chill for 5–10 minutes to set.
- Serve immediately or refrigerate in a single layer for up to 2 days.
Notes
- Use wax-free apples and dry them thoroughly for the best caramel adhesion.
- You can swap cream for coconut milk to make this dairy-free.
- Avoid freezing—texture and caramel quality will suffer after thawing.
- Want a drizzle instead of a dip? Thin the caramel slightly with more cream.
- For extra flavor, brush slices with nut butter before dipping.
Conclusion
Caramel apple slices bring together the irresistible sweetness of caramel and the tart crunch of fresh apples—in a form that’s easy to prep, serve, and enjoy. Whether you’re whipping up a platter for a party, a fun snack for kids, or a cozy dessert for two, these slices deliver comfort and fun in every bite. Best of all, they take minutes to make and require no fancy tools or baking skills. Just slice, dip, and decorate.
Looking for inspiration? Try our ambrosia salad recipe for another colorful, fruit-forward treat to pair with your apple slices!