If you’ve been dreaming of a dessert that delivers the rich intensity of coffee and the smooth decadence of cheesecake, you’re in the right place. This creamy coffee cheesecake is everything you love about a sweet treat—with the bold, satisfying flavor of coffee and the lush, velvety texture of a classic cheesecake. Whether you’re a serious espresso aficionado or just love desserts with depth, this cheesecake is bound to be your new favorite.
Looking for inspiration? Try Coffee Cheesecake – Irresistibly Bold, Creamy, and Easy to Make.
Unlike overly complicated recipes, this one balances elegance and ease. With a few smart techniques and high-impact ingredients, you’ll bake a creamy coffee cheesecake that not only tastes professional but looks picture-perfect too. Let’s dive into what makes this recipe so unforgettable.
Jump to:
Why You’ll Love This Creamy Coffee Cheesecake
A Heavenly Fusion of Coffee and Cheesecake
Imagine the bold notes of freshly brewed espresso mingling with smooth, rich cream cheese in every bite. That’s the magic of creamy coffee cheesecake—a sophisticated dessert that delivers a complex, addictive flavor profile without being overwhelming. The cheesecake base absorbs the coffee beautifully, enhancing the overall creaminess and offering a gentle buzz of java delight.
This flavor fusion is perfect for adults who want something a little more refined than a standard cheesecake but still crave that indulgent texture and sweet comfort.
Perfect for Every Occasion – From Brunch to Holiday Feasts
Whether you’re celebrating a birthday, hosting a brunch, or putting the finishing touch on a holiday meal, creamy coffee cheesecake fits every setting. It stands out at potlucks and steals the show on dessert tables.
Unlike airy cakes or overly sugary pies, this dessert strikes a balance—rich but not heavy, bold yet familiar. And thanks to its make-ahead nature, it’s a stress-free showstopper you can prepare a day in advance.
Discover great ideas like this Banana Cake Mix – The Ultimate Guide to Elevating Box Recipes.
Why else you’ll love it?
- It’s easy to slice, transport, and serve
- Customizable toppings add flair
- It’s freezer-friendly, so leftovers are no problem
If you’ve never tried creamy coffee cheesecake before, this is the time to fall in love with it.
Preparation and Cooking Time
Quick Prep With Make-Ahead Option
One of the best things about this creamy coffee cheesecake is how efficiently it comes together. From mixing the ingredients to baking and chilling, the process is streamlined and beginner-friendly.
Here’s a breakdown of your time investment:
| Task | Time Required |
|---|---|
| Preparing crust | 10 minutes |
| Making cheesecake batter | 15 minutes |
| Baking | 55–65 minutes |
| Cooling at room temp | 1 hour |
| Chilling in refrigerator | Minimum 4 hours (overnight recommended) |
That means in just over an hour of active time, you can create a café-worthy creamy coffee cheesecake that’ll impress everyone—from casual dinner guests to picky dessert critics.
Planning a party? Make it the night before and let the flavors settle and intensify while it chills overnight. You’ll save time on the big day and serve a dessert that’s even better the next day.
Don’t miss our Homemade Caramel Apples – The Ultimate Guide for another great make-ahead dessert idea.
Time-Saving Techniques and Tools
Want to make your prep even faster? Try these kitchen-tested time-savers:
- Use a food processor for crushing your crust ingredients—way faster than a rolling pin.
- Line your pan with parchment to skip any stuck crust drama.
- Prep ingredients ahead of time by letting cream cheese come to room temp early—it blends smoother and faster.
And if you’re all about efficiency, invest in a springform pan. It’s a must-have for cheesecake success and cuts your cleanup time in half.

Ingredients
Key Components for the Ultimate Creamy Texture
What makes this creamy coffee cheesecake so irresistibly smooth? It all starts with high-quality, full-fat ingredients. The richness of cream cheese, the silkiness of sour cream, and the perfect balance of sweetness and bitterness from coffee create a luxurious mouthfeel that’ll have your guests begging for seconds.
Here’s everything you’ll need:
For the crust:
- 1 ½ cups graham cracker crumbs
- ¼ cup granulated sugar
- ½ cup unsalted butter, melted
For the filling:
- 3 (8-ounce) blocks cream cheese, softened
- 1 cup granulated sugar
- 3 large eggs
- 1 cup sour cream
- ¼ cup heavy cream
- 2 tablespoons all-purpose flour
- 2 tablespoons instant espresso or strong brewed coffee (cooled)
- 1 teaspoon vanilla extract
- ¼ teaspoon salt
Optional but recommended:
- 1 teaspoon coffee liqueur for enhanced depth
- ½ teaspoon ground cinnamon for a subtle spice undertone
For the topping (optional):
- Whipped cream
- Chocolate-covered espresso beans
- Dusting of cocoa powder
Looking for a fun twist on your dessert base? Discover great ideas like this Hoe Cake Bread – The Ultimate Southern Classic.
Best Coffee Options for Bold Flavor
To get the best flavor in your creamy coffee cheesecake, your coffee choice matters. While instant espresso works perfectly and blends easily into the batter, don’t be afraid to use:
- Cold brew concentrate for a smoother finish
- Freshly brewed espresso for bold, robust notes
- Coffee liqueurs for a boozy twist
Just make sure your coffee is cool before adding it to your batter—hot liquid can curdle the dairy and throw off the texture.
For a layered flavor profile, try combining both instant espresso and a dash of coffee liqueur—they enhance each other beautifully without overpowering the cheesecake.
Step-by-Step Instructions
How to Make the Perfect Crust
The base sets the tone for the entire dessert. A buttery, crisp crust gives structure and contrast to the rich filling.
- Preheat oven to 325°F (163°C).
- Combine graham cracker crumbs, sugar, and melted butter in a bowl. Mix until it resembles wet sand.
- Press the mixture evenly into the bottom of a 9-inch springform pan. Use a flat-bottom glass for a firm press.
- Bake the crust for 10 minutes. Remove and let it cool while you prep the filling.
Layering and Baking the Cheesecake for Best Results
Now for the silky, coffee-infused filling that makes this cheesecake unforgettable.
- In a large mixing bowl, beat softened cream cheese on medium speed until smooth and lump-free.
- Add sugar and beat again for about 2 minutes.
- Add eggs one at a time, mixing gently after each addition—don’t overbeat.
- Mix in sour cream, heavy cream, flour, vanilla, espresso (or cooled brewed coffee), and salt until smooth.
- Optional: stir in coffee liqueur or cinnamon for added depth.
- Pour the batter into your pre-baked crust.
To avoid cracks and promote even baking:
- Tap the pan gently on the counter to release air bubbles.
- Place the cheesecake pan in a water bath—wrap the pan with foil and place it in a larger pan filled with hot water halfway up the sides.
- Bake for 55–65 minutes or until the center slightly jiggles but edges are set.
- Turn off the oven and crack the door open. Let the cheesecake sit for 1 hour inside.
- Remove and let it cool to room temp before chilling.
Cooling and Chilling Techniques for a Flawless Finish
This step is where the magic happens. Your cheesecake may seem a little soft right after baking—that’s normal.
- After cooling to room temperature, cover it tightly with foil or plastic wrap.
- Refrigerate for at least 4 hours, but overnight is best for flavor development and firm texture.
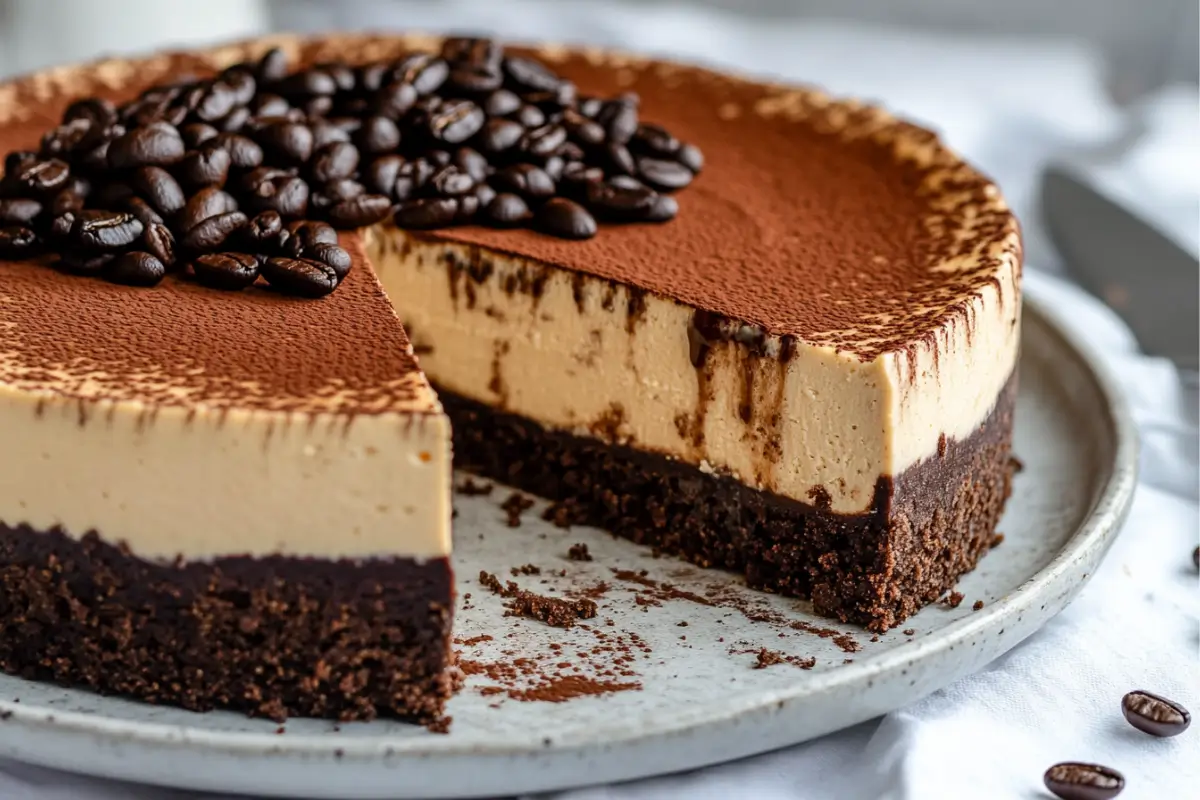
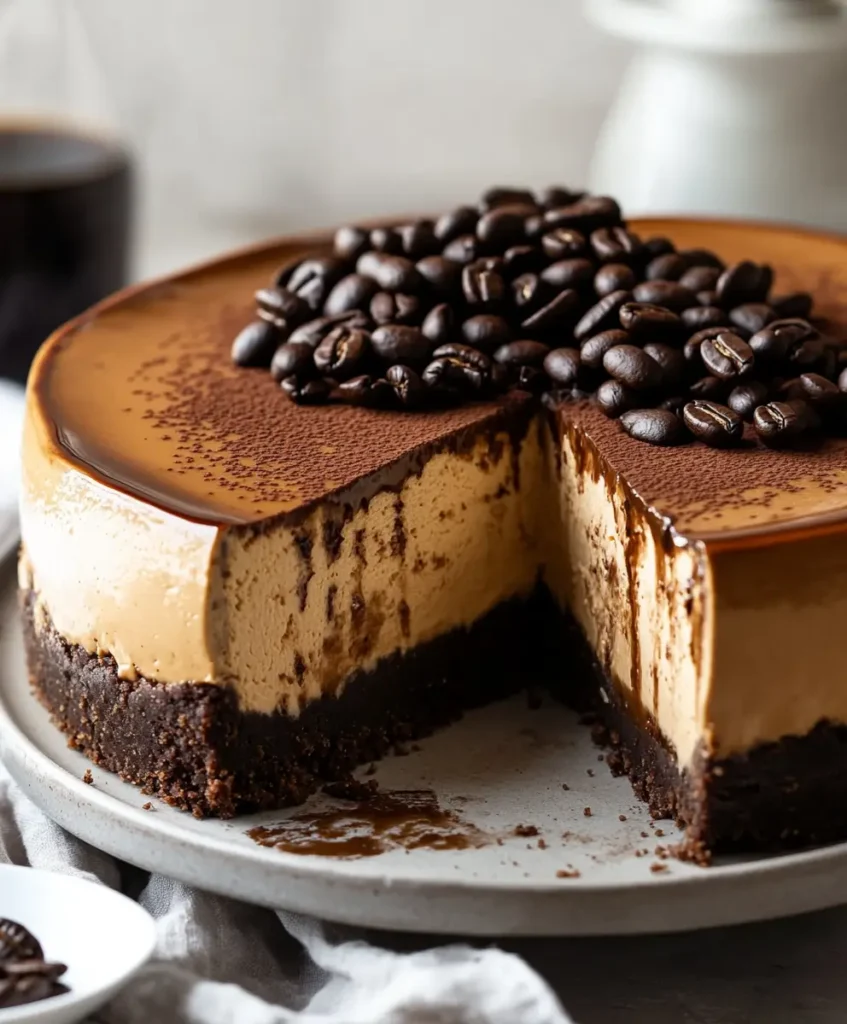
Before serving, you can top your creamy coffee cheesecake with whipped cream, shaved chocolate, or cocoa powder for an irresistible final touch.
You’ve now mastered a dessert that looks like it came straight from a bakery.
How to Serve
Plating Ideas for Presentation Perfection
Presentation matters—especially when you’ve put love into every step of this creamy coffee cheesecake. With its rich coffee hue and creamy texture, this dessert is already visually striking. But a few plating tricks can turn it into a true showstopper:
- Slice with a hot knife: Dip your knife in hot water and wipe it clean before each cut. This ensures smooth, clean edges.
- Place on a cake stand: Elevate your cheesecake (literally and figuratively) by serving it on a pedestal stand with a white or dark backdrop.
- Accent with garnishes: Dust the top with cocoa powder or espresso powder, pipe rosettes of whipped cream, and add chocolate-covered espresso beans or coffee shavings.
For added drama, drizzle each slice with chocolate or caramel sauce right before serving.
Toppings and Sides That Pair Well with Creamy Coffee Cheesecake
While this dessert is stunning on its own, thoughtful toppings and pairings can enhance every bite.
Here are some pairing ideas:
| Topping | Flavor Impact |
|---|---|
| Whipped cream | Lightens the richness |
| Chocolate ganache drizzle | Deepens the chocolate-coffee vibe |
| Coffee syrup or liqueur | Doubles the coffee experience |
| Crushed toffee or nuts | Adds crunch and texture |
| Fresh berries | Offers a tart contrast |
Want a beverage pairing? Try it with:
- Espresso or Americano for a bold finish
- Baileys or Kahlúa on ice for a boozy pairing
- Iced coffee or cold brew on hot days
For fans of dessert drinks, this cheesecake also pairs beautifully with a sweet vanilla latte.
Don’t miss our Swiss Chocolate Chalet Cake for another elegant dessert idea to pair on your next dessert board.

Additional Tips
Avoiding Cracks and Achieving a Silky Finish
A creamy coffee cheesecake isn’t just about flavor—it’s about texture and appearance too. Here’s how to make sure yours is smooth, crack-free, and bakery-beautiful.
- Don’t overmix your batter. Too much air = cracks. Mix just until ingredients are combined.
- Use a water bath during baking. This regulates oven heat and provides moisture, reducing the chance of cracking.
- Cool gradually. Abrupt changes in temperature can cause the top to split. Always cool in the oven with the door ajar before chilling.
- Run a knife around the edges after baking. This prevents the cheesecake from sticking to the pan as it contracts while cooling.
Still got a crack? No worries. Cover it with whipped cream or ganache. No one will ever know.
Flavor Intensification Tips Using Espresso, Syrups, and Spices
Want your creamy coffee cheesecake to stand out even more? Amp up the flavor with these pro tricks:
- Add a shot of espresso for bolder coffee notes
- Incorporate coffee liqueur like Kahlúa into the batter or drizzle it over the top before serving
- Use espresso powder instead of regular instant coffee for a richer aroma
- Mix in a dash of ground cinnamon or nutmeg for warmth and spice
- Swirl in chocolate ganache before baking for a mocha twist
If you love layered flavors, consider adding a chocolate ganache topping or a salted caramel drizzle to complement the coffee. For something lighter, fresh berries or a dusting of cocoa will keep the coffee flavor center stage without overwhelming the palate.
Recipe Variation
No-Bake Creamy Coffee Cheesecake Version
If you’re short on time or avoiding the oven, a no-bake version is your best friend. This spin on creamy coffee cheesecake is just as indulgent—without the baking fuss.
How to make it:
- Crust: Mix graham cracker crumbs with melted butter and press into a springform pan. Chill for 30 minutes.
- Filling:
- 3 blocks of cream cheese (softened)
- 1 cup powdered sugar
- 1 cup whipped topping or whipped cream
- ¼ cup strong coffee or espresso
- 1 tsp vanilla
- Beat all ingredients until smooth and fluffy. Pour over crust.
- Chill for at least 6 hours or overnight until firm.
Pro tip: Stabilize the filling by adding a tablespoon of gelatin (dissolved in warm water) before mixing. This keeps it sliceable yet soft.
No-bake cheesecake is perfect for summer events or when you need a make-ahead dessert that’s low-maintenance but crowd-pleasing.
Keto, Gluten-Free, or Vegan Alternatives
Want to make this creamy coffee cheesecake suitable for special diets? You’ve got options—and they taste just as dreamy.
Keto Coffee Cheesecake:
- Use almond flour and butter for a low-carb crust
- Replace sugar with erythritol or monk fruit sweetener
- Use full-fat cream cheese and heavy cream
- Add collagen or protein powder for extra nutrition
Gluten-Free Option:
- Swap out graham crackers for gluten-free cookies or GF oats
- Double-check that all ingredients, especially vanilla extract and coffee, are certified gluten-free
Vegan Coffee Cheesecake:
- Crust: Combine dates, almonds, and coconut oil
- Filling: Blend soaked cashews, coconut cream, maple syrup, espresso, lemon juice, and vanilla
- Chill overnight to set (no baking required)
These versions maintain the core appeal of creamy coffee cheesecake—rich, satisfying texture and deep coffee flavor—while being friendly to your guests’ dietary needs.
Freezing and Storage
Best Practices for Refrigerating Leftovers
Once your creamy coffee cheesecake is chilled and served, chances are you’ll have a few slices left—especially if you’ve made a large batch for a party or holiday meal. Here’s how to store it properly in the fridge:
- Cool completely first: Never refrigerate a warm cheesecake—it’ll sweat and lose texture.
- Wrap tightly: Use plastic wrap followed by foil, or place in an airtight cake container.
- Store in the coldest part of your fridge: Ideally, the back shelf.
This will keep your creamy coffee cheesecake fresh for up to 5 days. After that, the texture may begin to break down, and the flavors can dull.
Pro tip: Place a paper towel beneath your cheesecake slice inside the container to absorb any excess moisture that might affect the crust.
Freezer Tips for Longer Preservation Without Texture Loss
Need to make your creamy coffee cheesecake well in advance? Freezing is your friend. Follow these steps to preserve flavor and texture:
To freeze the whole cheesecake:
- Chill overnight in the fridge.
- Wrap the entire cheesecake tightly with plastic wrap and then aluminum foil.
- Label with the date.
- Freeze for up to 3 months.
To freeze individual slices:
- Place slices on a baking sheet and freeze until solid (about 1 hour).
- Wrap each slice in plastic and foil.
- Store in a zip-top freezer bag or airtight container.
Thawing Tips:
- Fridge thaw: For best results, thaw overnight in the refrigerator.
- Quick thaw: For same-day serving, let slices sit at room temperature (still wrapped) for 2–3 hours.
Avoid microwaving—it can ruin the texture and create sogginess or heat spots.
Once thawed, your cheesecake will retain its creamy coffee cheesecake glory with minimal change in flavor or consistency.
Special Equipment
Tools That Make Your Cheesecake Foolproof
Baking a creamy coffee cheesecake isn’t complicated, but using the right tools can make all the difference between a good dessert and a showstopper. Here’s what every cheesecake baker should have on hand:
Must-Have Equipment:
- 9-inch springform pan: The gold standard for easy release and clean slices.
- Electric hand mixer or stand mixer: Ensures smooth, lump-free batter.
- Rubber spatula: Helps scrape down the sides of the bowl without incorporating too much air.
- Mixing bowls (glass or metal): For beating, combining, and cooling ingredients.
- Measuring cups & spoons: Accurate measurements = consistent results.
- Oven thermometer: Ensures your oven is at the right temperature, especially for sensitive cheesecakes.
Don’t miss our favorite cake-making gear round-up in Strawberry Dole Whip: The Best Refreshing Treat.
Nice-to-Have Tools:
- Water bath pan or roasting pan: Essential for reducing cracks by maintaining a moist baking environment.
- Cooling rack: Helps your cheesecake cool evenly and quickly before refrigeration.
- Cake lifter: Makes transferring to a serving plate stress-free.
Budget vs. Premium Equipment Options
You don’t have to spend a fortune, but if you bake often, investing in high-quality tools pays off. Here’s a quick comparison:
| Tool | Budget Option | Premium Option |
|---|---|---|
| Springform Pan | Nonstick aluminum (under $10) | Heavy-duty leak-proof steel (around $30) |
| Mixer | Basic handheld (under $20) | Stand mixer (KitchenAid style ~$250+) |
| Oven Thermometer | Analog clip-on ($5–$8) | Digital probe or Bluetooth thermometer (~$25) |
No matter your budget, the right equipment helps deliver that flawless creamy coffee cheesecake texture—smooth, crack-free, and perfectly set.
Frequently Asked Questions
What makes a coffee cheesecake creamy?
It’s all about the ingredients and technique. Full-fat cream cheese, sour cream, and heavy cream create a silky base. Avoid overmixing and bake slowly using a water bath to preserve the rich, smooth texture. These steps ensure your creamy coffee cheesecake is indulgent without being dense or dry.
Can I use instant coffee in cheesecake?
Absolutely. Instant espresso powder is actually preferred for ease of mixing and bold coffee flavor. You can also use cooled brewed coffee or cold brew concentrate, but always make sure it’s not too hot—hot liquid can curdle the batter.
How long should I chill my coffee cheesecake before serving?
A minimum of 4 hours is essential, but for best results, let your creamy coffee cheesecake chill overnight. This helps the texture firm up and the flavors meld beautifully, resulting in a more polished and flavorful dessert.
Can I make this coffee cheesecake ahead of time?
Yes! In fact, it’s encouraged. Prepare it one to two days in advance to give it time to set and develop a deeper flavor. Just store it in the fridge wrapped tightly or in an airtight container.
What’s the best type of coffee to use?
Go for strong and bold flavors—instant espresso, cold brew concentrate, or even coffee liqueurs like Kahlúa. Avoid weak brews, as they can get lost in the richness of the cheesecake. A dark roast or espresso blend works best for that signature punch in a creamy coffee cheesecake.
How do I know when my cheesecake is perfectly baked?
The edges will be set, but the center should jiggle slightly like gelatin. Don’t worry—it will firm up as it cools. Overbaking causes cracks and dryness, so trust the jiggle!
Conclusion
Whether you’re a seasoned baker or just exploring the world of desserts, this creamy coffee cheesecake recipe is a total game-changer. It’s rich yet balanced, elegant but approachable, and perfect for everything from family dinners to special celebrations.
From understanding the ingredients to nailing the chill time, you’ve now got all the secrets to make this dessert a star. Pair it with your favorite coffee, top it creatively, and make it your own.
Craving more smooth, bold, and indulgent dessert ideas? Don’t miss our Strawberry Dole Whip or check out Coffee Cheesecake for another variation you’ll love.
PrintCreamy Coffee Cheesecake
Bold espresso meets rich, silky cream cheese in this creamy coffee cheesecake—an indulgent make-ahead dessert perfect for coffee lovers and special occasions.
- Prep Time: 25 minutes
- Cook Time: 65 minutes
- Total Time: 1 hour 30 minutes
- Yield: 10 servings
- Category: Dessert
- Method: Baking
- Cuisine: American
- Diet: Vegetarian
Ingredients
For the Crust:
- 1 ½ cups graham cracker crumbs
- ¼ cup granulated sugar
- ½ cup unsalted butter, melted
For the Filling:
- 3 (8-ounce) blocks cream cheese, softened
- 1 cup granulated sugar
- 3 large eggs
- 1 cup sour cream
- ¼ cup heavy cream
- 2 tablespoons all-purpose flour
- 2 tablespoons instant espresso or cooled brewed coffee
- 1 teaspoon vanilla extract
- ¼ teaspoon salt
- Optional: 1 teaspoon coffee liqueur, ½ teaspoon ground cinnamon
For the Topping (Optional):
- Whipped cream
- Chocolate-covered espresso beans
- Cocoa powder, for dusting
Instructions
- Prepare the crust: Preheat oven to 325°F (163°C). Mix graham cracker crumbs, sugar, and melted butter until combined. Press into a 9-inch springform pan. Bake for 10 minutes and let cool.
- Make the filling: In a large bowl, beat softened cream cheese until smooth. Add sugar and beat again. Mix in eggs one at a time, then sour cream, heavy cream, flour, vanilla, espresso, and salt until fully combined. Stir in optional liqueur and spices if using.
- Bake the cheesecake: Pour batter into crust. Wrap the pan with foil and place it in a water bath. Bake for 55–65 minutes, or until the edges are set and center slightly jiggles. Cool in oven with the door cracked for 1 hour.
- Chill: Remove and cool to room temperature. Cover and refrigerate for at least 4 hours or overnight.
- Serve: Garnish with whipped cream, cocoa powder, and coffee beans if desired. Slice with a hot knife for clean edges.
Notes
For a no-bake version, use whipped cream instead of eggs and omit baking—chill for 6+ hours. Use espresso powder for stronger flavor. Cheesecake keeps 5 days in the fridge or up to 3 months in the freezer.