If you’re dreaming of a dessert that captures the magic of the season, the winter wonderland cake is the showstopper you’ve been searching for. Picture a snowy, frosted masterpiece glittering with edible snowflakes, shimmering sugar, and delicate icing trees. This cake isn’t just dessert—it’s a centerpiece. Whether you’re hosting a Christmas party, celebrating a winter birthday, or planning a cozy family gathering, a winter wonderland cake brings elegance and festive spirit to any table.
In this complete guide, we’ll cover everything from essential ingredients to decoration tips, creative variations, make-ahead hacks, and answers to your top baking questions. Whether you’re a first-time baker or a seasoned dessert artist, you’ll learn how to build a cake that looks as magical as it tastes.
Looking for inspiration? Try our pineapple cake mix recipes for a fruity twist on holiday baking!
Jumo to:
What is a Winter Wonderland Cake?
Defining the Winter Wonderland Cake Theme
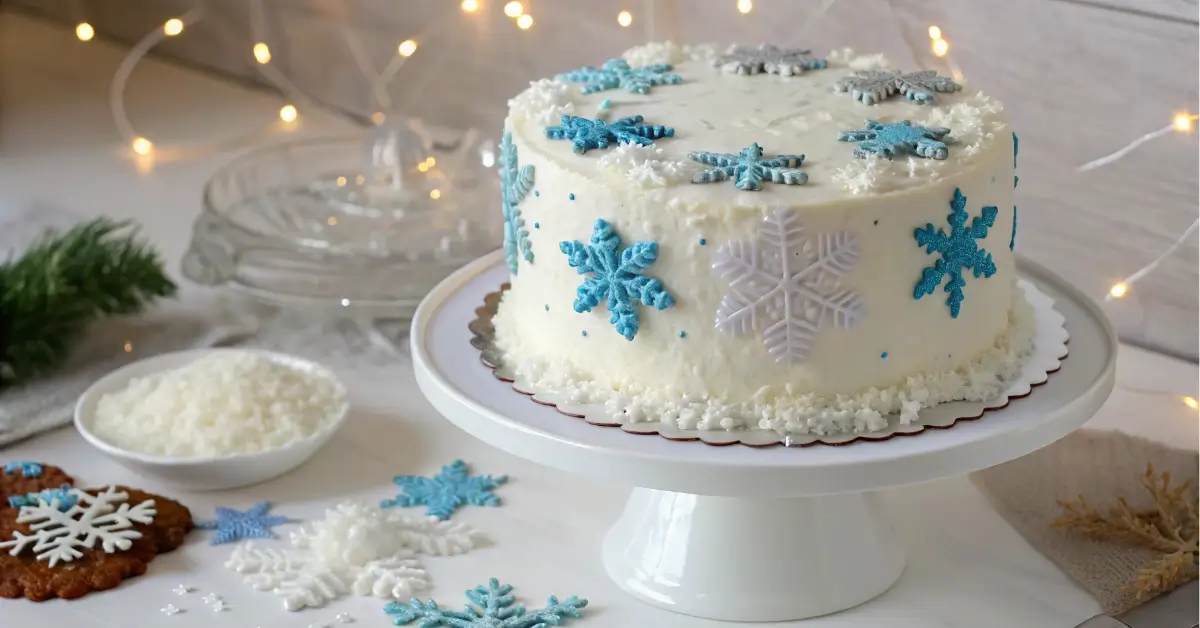
The winter wonderland cake is more than just a seasonal dessert—it’s an edible work of art that captures the beauty of snowy landscapes and frosty scenes. It’s usually a layered cake, covered in snow-white frosting or fondant, adorned with winter-inspired decorations like edible snowflakes, silver dragees, coconut flakes, and sugared cranberries.
This cake draws from a wintery color palette: think whites, silvers, pale blues, and shimmering finishes. Many bakers love adding a touch of sparkle with edible glitter or sugar glass. It’s not only visually striking, but also incredibly versatile in terms of flavor and decoration style.
Why It’s the Perfect Holiday Centerpiece
When you place a winter wonderland cake on your dessert table, it immediately becomes the focal point. It complements other holiday elements—twinkling lights, candles, pinecones, and garlands—and brings a wintry charm to your spread. Unlike generic cakes, it’s tailored to match the elegance of the season.
Another reason this cake stands out is its adaptability. You can keep it simple and rustic with buttercream and coconut or go all out with fondant snowmen and glittery sugar sculptures. No matter your decorating skill level, a winter wonderland cake offers plenty of room for creativity.
Check out banana wafer pudding as a cozy companion to this elegant dessert.
Essential Ingredients for Winter Wonderland Cake
Cake Base Options (Vanilla, Chocolate, Red Velvet)
The foundation of a breathtaking winter wonderland cake is the cake base itself. Choosing the right flavor ensures your cake tastes just as delightful as it looks. Here are a few classic base options to consider:
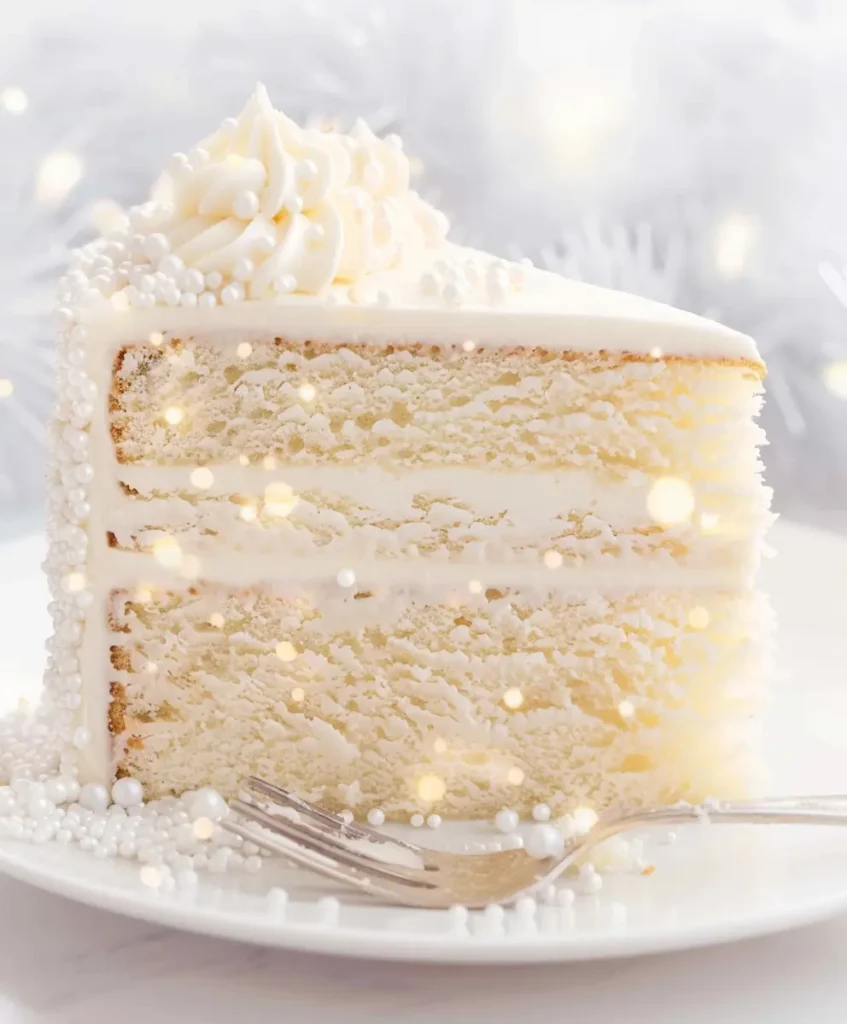
- Vanilla Cake – The most common choice for a winter wonderland cake, vanilla provides a neutral yet rich flavor that pairs beautifully with fruity fillings and sweet frostings. Its light color also complements white frosting and decorations perfectly.
- Chocolate Cake – If you want a deeper flavor, a moist chocolate cake offers a nice contrast under snow-white frosting. It also holds up well with fondant or buttercream.
- Red Velvet Cake – With its signature deep red hue and slight tang from buttermilk and vinegar, red velvet adds a festive twist to your holiday dessert while keeping the texture soft and creamy.
When choosing your base, consider the preferences of your guests and how well the flavors will balance with your fillings and frostings.
Frosting Types (Buttercream, Cream Cheese, Fondant)
Once you’ve settled on the cake flavor, the next step is choosing the right frosting. For a cake as decorative as a winter wonderland cake, your frosting plays both a functional and aesthetic role.
- Buttercream Frosting – A classic and crowd favorite, buttercream is easy to color, spread, and pipe. It’s perfect for snowy swirls and textured finishes.
- Cream Cheese Frosting – Slightly tangy with a silky texture, cream cheese pairs especially well with red velvet and carrot cake bases. However, it’s a bit softer and may require refrigeration.
- Fondant – For bakers who want a smooth, professional finish, fondant is your go-to. It creates a clean white canvas that can be painted, textured, or shaped into snowflakes, ribbons, and more.
To enhance the wintery vibe, try coloring a small amount of your frosting pale blue or shimmering silver. You can also infuse your frosting with subtle flavors like peppermint, almond, or cinnamon to evoke holiday feels.
Don’t miss our soft sourdough sandwich bread recipe for another holiday-worthy baking challenge.
Edible Decorations and Their Purpose (Snowflakes, Glitter, Icing Trees)
The decorations make your cake magical. Here’s a breakdown of what works best for transforming your basic cake into a stunning winter wonderland cake:
| Decoration Type | Material/Ingredients | Purpose & Effect |
|---|---|---|
| Edible Snowflakes | Royal icing, fondant | Adds a snowy, frozen feel; place them vertically or flat |
| Sugar Glass Shards | Boiled sugar & corn syrup | Mimics ice crystals or frozen lakes |
| Coconut Flakes | Unsweetened or sweetened | Gives a soft, snow-like effect around the base |
| Icing Trees | Piped green/white icing | Builds scenery and depth to your cake design |
| Edible Glitter/Dust | Food-grade shimmer powder | Adds sparkle under lighting |
| Meringue Peaks | Whipped egg whites & sugar | Create mountain-like snowy caps |
Always make sure your decorations are food-safe and edible. Avoid using non-edible glitter unless clearly marked for cake decorating. Stick with trusted products to keep your dessert safe for everyone to enjoy.
Check out shaved beef recipes for a savory balance to your sweet creations.
Step-by-Step Recipe for the Best Winter Wonderland Cake
Baking the Base: Pro Tips for Moist, Even Layers
Creating a flawless winter wonderland cake starts with a well-baked base. Whether you’re going with vanilla, chocolate, or red velvet, a few universal baking tips ensure your layers are even, fluffy, and hold up well for decorating:
- Room Temperature Ingredients – Butter, eggs, and milk should be at room temperature for a smooth batter and better structure.
- Use Cake Flour – For a soft, delicate crumb, opt for cake flour over all-purpose flour.
- Do Not Overmix – Overmixing develops too much gluten, which can make your cake dense instead of light.
- Even Pans – Use a kitchen scale to divide batter evenly between pans for uniform layers.
- Bake Low & Slow – Reduce the oven temperature slightly (325°F instead of 350°F) and bake a little longer. This helps prevent doming and keeps layers level.
Optional Flavor Enhancers:
- Add a teaspoon of peppermint extract or almond essence for a festive twist.
- Toss in white chocolate chips or sugared cranberries for extra texture.
Here’s a quick reference recipe for a classic 3-layer vanilla base:
| Ingredient | Amount |
|---|---|
| Unsalted butter | 1 cup (softened) |
| Granulated sugar | 2 cups |
| Eggs | 4 (large) |
| Cake flour | 3 cups |
| Baking powder | 2 tsp |
| Salt | ½ tsp |
| Whole milk | 1 cup |
| Vanilla extract | 2 tsp |
Discover great ideas like salmon patties recipe for savory crowd-pleasers to pair with your dessert.
Assembling the Layers & Creating Stability
Once your layers are fully cooled (always let them cool for at least 1 hour), it’s time to build the structure of your winter wonderland cake:
- Trim and Level each cake layer using a serrated knife or cake leveler.
- Add Frosting Between Layers generously, spreading evenly and pushing to the edges.
- Chill the Cake after stacking to help set the frosting and prevent slipping.
- Insert Dowels or Straws if your cake is tall—this keeps it stable when decorating.
- Crumb Coat your cake with a thin layer of frosting and refrigerate for 30 minutes before applying the final coat.
This is your canvas—take time to get it smooth and stable before you start adding magical elements.
Frosting Techniques for a Snowy Finish
Frosting your cake is where the real winter wonderland cake magic begins. Here are a few winter-themed techniques:
- Smooth & Sleek Finish – Use an offset spatula and bench scraper for a polished fondant-ready surface.
- Rustic Buttercream Swirls – Create movement by swirling white buttercream for a soft snowfall effect.
- Textured Snowbank Sides – Press desiccated coconut or sanding sugar along the base for a snowy texture.
- Ombre Icing Fade – Gradually shift from pale blue at the base to bright white at the top for a magical winter skyline.
Optional Add-ons:
- Brush the finished cake with edible glitter for sparkle.
- Add a soft blue gel tint to white frosting to mimic ice or a frosty sky.
Don’t miss our air fry salmon bites recipe for a healthy option to round out your winter feast.
Decoration Ideas to Transform Your Cake into a Winter Wonderland
How to Make Edible Snowflakes, Trees, and Icicles
The decorations are what turn a simple cake into a winter wonderland cake. These edible elements not only look stunning but are easy to make at home with basic tools.
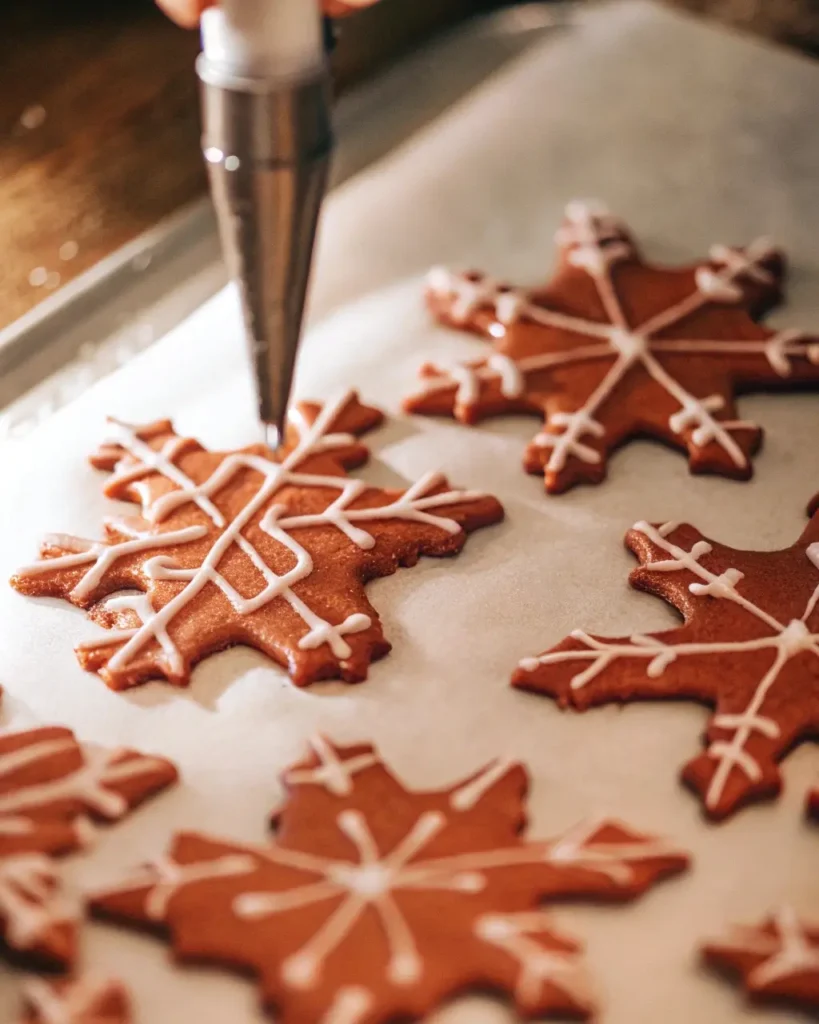
❄️ Edible Snowflakes
You can craft snowflakes using either royal icing or fondant.
- Royal Icing Method: Use a piping bag with a small tip to draw snowflake patterns on wax paper. Let them dry for at least 24 hours before placing them on the cake. Add shimmer with edible glitter.
- Fondant Method: Use snowflake cookie cutters to cut out shapes. Dust with pearl luster dust for an icy finish.
🌲 Icing Trees
These are great for adding vertical interest and “landscape” feel to your cake.
- Pipe green or white buttercream trees using a star tip directly onto the cake or make them on parchment first and transfer once firm.
- For extra detail, top them with mini sugar pearls or dust them lightly with powdered sugar to simulate snow.
🧊 Sugar Icicles
Sugar icicles add a frozen, magical element:
- Melt white candy melts or isomalt and drizzle it over the edge of a chilled cookie sheet.
- Once hardened, break into shards and press gently into the cake’s edges or top layer.
Using White Chocolate, Sugar Glass & Coconut for Texture
Texture is key to a truly believable winter wonderland cake. These ingredients are pantry-friendly and add both visual impact and flavor:
| Ingredient | Use Case | Visual Effect |
|---|---|---|
| White chocolate | Shaved or curled on top | Mimics snow or bark |
| Sugar glass | Poured and cracked into shards | Looks like frozen lakes |
| Shredded coconut | Pressed onto frosting or base of cake | Soft, fluffy snow |
| Meringue drops | Scattered across top layer | Little snowball peaks |
Tools You’ll Need for Intricate Cake Design
You don’t need to be a pastry chef to create something stunning. These simple tools can take your winter wonderland cake from basic to breathtaking:
- Offset spatula – For smooth frosting application
- Piping bags and star tips – Essential for trees, borders, and snow peaks
- Snowflake cutters or templates – Create uniform fondant snowflakes
- Edible glitter spray – Add sparkle quickly and evenly
- Cake turntable – Makes decorating much easier and more precise
- Tweezers – For delicate placement of pearls and micro-sprinkles
Keep your tools clean and dry to prevent clumping or smearing of decorations. Chill your cake between layers of decorating to lock in shapes and textures.
Learn more about how to balance your holiday spread with easy dinner ideas like shaved beef.
Themes and Variations for Winter Wonderland Cake
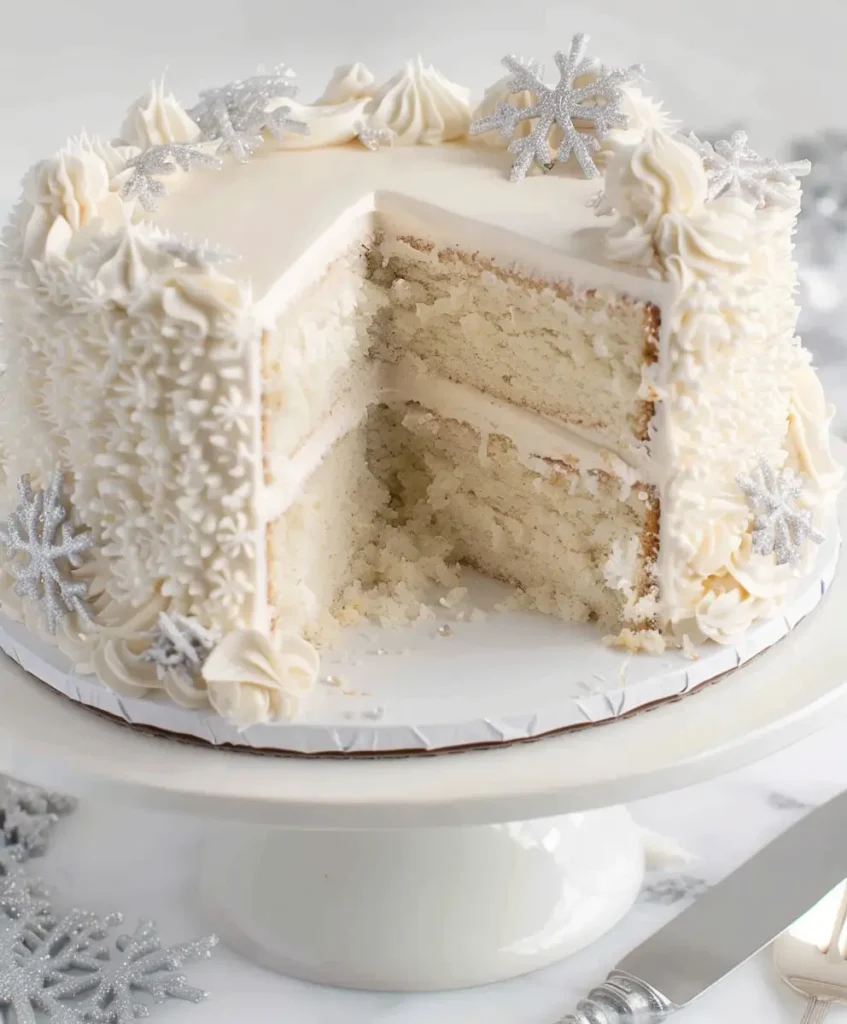
Classic White Christmas Cake
If you’re going for timeless elegance, the Classic White Christmas Cake is your go-to. This version of the winter wonderland cake features a pure white base with icy blue or silver accents. It’s a favorite for formal gatherings or classy Christmas dinner tables.
Key features:
- White fondant or smooth buttercream as the base
- Piped snowflakes and white sugar pearls
- A crown of edible glitter or silver dragees
- Optional tiered design for upscale presentation
To elevate the flavor, consider adding:
- White chocolate ganache between layers
- Almond or peppermint extract for wintery notes
Pair it with a white or silver cake stand to complete the theme.
Frozen-Inspired Winter Cake for Kids
For a younger crowd or a themed birthday, go all in with a Frozen-inspired winter wonderland cake. Inspired by the colors and textures of the beloved animated film, this cake is fun, colorful, and interactive.
Popular elements:
- Blue and purple gradient buttercream for a magical sky effect
- Fondant snowman and reindeer toppers
- Rock candy crystals or blue sugar shards
- Use edible markers to draw snowflakes or character outlines
It’s a hit at winter birthday parties, especially when paired with matching cupcakes or cake pops.
Rustic Woodland Style with Natural Tones
If you’re leaning toward a more organic or rustic aesthetic, this version blends earthy charm with a snowy touch. The woodland winter wonderland cake is perfect for cozy cabin parties or outdoor winter weddings.
Design tips:
- Naked cake layers with minimal frosting to show off the cake’s texture
- Use pinecones, rosemary sprigs, and sugared cranberries as toppings
- Edible bark texture made with melted chocolate or chocolate fondant
- Decorate with gold dusted acorns or pressed edible flowers
This variation pairs well with warm, spiced cake flavors like gingerbread, cinnamon swirl, or brown butter vanilla.
Discover great ideas like our pineapple cake mix recipes for pairing sweet, fruity notes with your cake presentation.
Tips for Making It Ahead & Storing the Cake
How to Keep It Fresh Before the Event
Baking your winter wonderland cake in advance can save you tons of stress, especially during the busy holiday season. Here’s how to do it without sacrificing flavor or presentation:
1. Bake Layers in Advance
- You can bake your cake layers up to 3 days in advance.
- Let the layers cool completely, then wrap each one tightly in plastic wrap followed by aluminum foil.
- Store them in the refrigerator or freeze for longer periods.
2. Frosting Prep
- Buttercream and cream cheese frostings can be made 1–2 days ahead and stored in airtight containers in the fridge.
- Before using, bring the frosting to room temperature and re-whip it to restore smooth texture.
3. Make Decorations Early
- Royal icing snowflakes and fondant pieces should be prepared at least 24–48 hours ahead so they harden properly.
- Store them in a cool, dry place (not the fridge!) in an airtight container layered between parchment paper.
Check out our soft sourdough sandwich bread guide if you’re prepping multiple baked goods ahead of time.
Best Freezing and Thawing Practices for Decorated Cakes
You can absolutely freeze a winter wonderland cake, even with some decorations—just follow the right steps to avoid sogginess or color bleeding.
Freezing Tips:
- Freeze unassembled cake layers for up to 2 months. Wrap tightly and label them with the baking date.
- A fully decorated cake can also be frozen, but stick to buttercream or ganache frostings, which freeze better than cream cheese or whipped frostings.
- Freeze the whole cake uncovered for 1 hour to firm up the surface, then wrap in plastic wrap and foil.
Thawing Tips:
- Move the cake from the freezer to the refrigerator 24 hours before serving.
- Let it come to room temperature for 1–2 hours before displaying.
- Avoid removing wrapping too early—this prevents condensation from ruining the design.
Looking for inspiration? Try our cozy banana wafer pudding dessert as a make-ahead option alongside your winter cake.
Common Mistakes to Avoid When Making a Winter Wonderland Cake
Overdecorating or Using Non-Edible Elements
One of the biggest traps with a winter wonderland cake is doing too much. It’s easy to get carried away with all the sparkle, snowflakes, and icing effects, but balance is everything.
Mistake #1: Overloading Decorations
Too many toppings can make your cake look cluttered, messy, or even unstable.
How to avoid it:
- Stick to a color theme (e.g., white, silver, icy blue)
- Choose 3–4 types of decorations max
- Keep space between design elements to let each one shine
Mistake #2: Using Non-Edible Decor
Glitter that isn’t food-safe, plastic snowflakes, or fake pine needles may look nice but are a hazard for guests—especially children.
How to avoid it:
- Only use edible glitter, fondant, or sugar paste items
- Clearly mark any non-edible toppers if you use them (e.g., “Remove Before Eating” signs)
Choosing the Wrong Frosting for Your Climate
If you’re in a warm or humid environment, not all frostings hold up the same. The last thing you want is a winter wonderland cake that melts or slouches before it hits the table.
Mistake #3: Using Soft Frosting in Warm Temps
Frostings like whipped cream or cream cheese can break down quickly in heat.
How to avoid it:
- Stick to buttercream or fondant for outdoor events or warm kitchens
- Chill your cake before transporting it
Mistake #4: Skipping a Crumb Coat
This thin base layer of frosting helps lock in crumbs and smooth the surface for final decorating. Without it, your cake can look rough or unprofessional.
How to avoid it:
- Always apply a crumb coat and refrigerate for 30–60 minutes before final frosting
Not Letting Layers Cool Properly
This might seem basic, but it’s a major problem for bakers in a rush. Decorating a warm cake leads to disaster.
Mistake #5: Decorating While Cake Is Still Warm
Warm layers will melt frosting, warp your structure, and create a soggy base.
How to avoid it:
- Allow cakes to cool fully before assembling or frosting (1–2 hours minimum)
- If you’re short on time, place layers in the fridge or freezer to speed things up
Avoiding these common errors can be the difference between a good cake and an unforgettable one. The key is to plan ahead, use quality ingredients, and go easy on the extras for a balanced, magical result.
Serving, Pairing & Presenting Your Cake
Elegant Serving Suggestions and Pairings (Drinks, Snacks)
A beautiful winter wonderland cake deserves to be part of an equally thoughtful dessert table. The right pairings enhance the cake’s flavor and help round out the experience for your guests.
🎄 Drink Pairings:
- White hot chocolate – Pairs beautifully with vanilla or coconut frostings
- Mulled wine – Adds warmth and spice, ideal for red velvet or spiced cakes
- Sparkling cider – Kid-friendly and complements sweet, fruity fillings
- Peppermint mocha – Great with chocolate-based cakes or mint-infused frostings
🍬 Sweet Snack Pairings:
- Mini meringue snowballs
- Chocolate-dipped pretzel sticks dusted with crushed candy canes
- Snowflake sugar cookies to match your cake theme
- Coconut macaroons for an added wintry feel
❄️ Savory Snacks for Contrast:
- A cheese board with brie, cranberries, and honey
- Prosciutto-wrapped figs for a salty-sweet combo
- Rosemary shortbread crackers to bridge the savory and sweet gap
When served with care, these treats round out your holiday spread and make the winter wonderland cake the star attraction.
Presentation Tips for Buffets and Dessert Tables
Even the most delicious cake can fall flat if it isn’t presented with a little flair. Here’s how to create an eye-catching setup that matches the cake’s aesthetic:
📸 Set the Scene:
- Use a white or silver cake stand to elevate your cake
- Add fairy lights, pine branches, and faux snow around the base
- Incorporate mirrored trays or glass risers to reflect light and shimmer
🌟 Highlight the Cake:
- Place the cake in the center of the dessert table with smaller treats around it
- Angle some decorations toward the cake to draw attention
- Add a mini sign or tag with the cake’s name and flavor—makes it feel special!
🧊 Keep It Chilled:
- If your event lasts several hours, especially in warm environments, store the cake in a cool area and only bring it out 30 minutes before slicing
Don’t miss our savory crowd-pleasers like salmon patties to balance your dessert-heavy spread.
Winter Wonderland Cake Inspiration & Occasions
Winter Birthdays, Christmas, and Holiday Events
The beauty of a winter wonderland cake is its versatility. Whether you’re hosting a festive gathering or celebrating a milestone during the chilly season, this cake sets the scene.
🎂 Winter Birthdays
Give a frosty spin to a classic birthday cake. A Frozen-inspired theme or a white-and-gold design works beautifully for kids and adults alike.
- Use custom cake toppers with names and glittery numbers
- Add themed cupcakes for a playful addition to the main cake
🎄 Christmas Parties
This is the prime time for a winter wonderland cake to shine. Whether it’s a casual get-together or a formal dinner, it ties in seamlessly with any Christmas décor.
- Match the cake colors to your home’s holiday color palette
- Use edible ornaments or candy canes as decor elements
🕯️ Holiday Gatherings
Hosting a seasonal brunch or winter-themed tea party? A snowflake cake adds just the right amount of elegance.
- Pair with warm drinks like cinnamon chai or vanilla lattes
- Display the cake alongside wrapped cookies or scones for a cozy feel
Creating a DIY Winter Dessert Table with Complementary Treats
A full dessert table transforms your winter wonderland cake from a standalone dessert into the anchor of a jaw-dropping winter spread. Here’s how to build one with ease:
Step 1: Choose a Color Palette
Stick to 3 core colors—white, silver, and one accent (like icy blue, lavender, or blush pink).
Step 2: Add Mini Treats
Balance your cake with smaller desserts in the same theme:
| Treat | Description |
|---|---|
| Snowflake cupcakes | Topped with fondant or piped icing snowflakes |
| Hot cocoa shots | Mini mugs of warm cocoa with marshmallows |
| Iced sugar cookies | Decorated to match your cake’s design |
| White chocolate truffles | Rolled in powdered sugar or coconut |
Step 3: Decorate the Table
Add texture with layered linens, glass jars, fairy lights, and fresh greenery (like fir or eucalyptus sprigs).
Step 4: Create Visual Height
Use cake stands, risers, or gift boxes wrapped in winter paper to vary the height of your desserts and add dimension.
FAQs About Winter Wonderland Cake
What is the best frosting for a Winter Wonderland Cake?
Buttercream frosting is the top choice for a winter wonderland cake thanks to its versatility and structure. It holds shape well, allows for intricate piping, and serves as a smooth base for fondant or edible decorations. If you’re aiming for a tangy flavor, cream cheese frosting works wonderfully with red velvet or spice cakes but requires refrigeration.
Can I make a Winter Wonderland Cake a day before the party?
Yes! In fact, making your winter wonderland cake a day early is often recommended. It allows the flavors to develop and the structure to stabilize. Just be sure to store it in the fridge in a cake box or loosely covered container, especially if using cream cheese or whipped frostings.
How do I make edible snowflakes or icicles at home?
To make edible snowflakes, pipe royal icing onto wax paper in snowflake shapes and let them harden for 24 hours. For icicles, use melted white chocolate or sugar to drizzle thin strands onto a chilled baking sheet. Once cooled, peel and place them carefully on the cake.
What are the best cake flavors for a winter-themed dessert?
Popular flavors include:
Vanilla bean – subtle and elegant
Red velvet – rich and festive
Chocolate – for a warm, cozy vibe
Spiced cake – flavored with cinnamon, clove, or nutmeg for extra holiday warmth
These flavors complement winter frostings like buttercream, cream cheese, and white chocolate ganache.
How long does it take to decorate a Winter Wonderland Cake?
Depending on the complexity of your design, decorating a winter wonderland cake can take 2 to 4 hours. That includes time for prepping frostings, setting decorations, and applying finishing touches. More intricate details like sugar work or piped trees may take longer, especially if drying time is needed.
Can I freeze a fully decorated Winter Wonderland Cake?
Yes, but with caution. Freeze the cake uncovered for 1 hour to firm up the frosting, then wrap it in plastic wrap followed by aluminum foil. Thaw it in the fridge overnight and bring it to room temperature before serving. Avoid freezing cakes with fresh fruit or whipped cream toppings.
Conclusion: Final Thoughts on Making a Magical Winter Wonderland Cake
The winter wonderland cake is more than just a dessert—it’s a showpiece that brings the spirit of the season to life. With its snowy textures, festive decorations, and endless variations, it’s the perfect centerpiece for winter birthdays, Christmas gatherings, or any holiday celebration.
From choosing the right base and frosting to decorating with edible snowflakes and presenting it with flair, you now have all the tools to create a stunning, unforgettable cake. Whether you’re baking it for loved ones or dazzling party guests, your winter wonderland cake will surely steal the spotlight.
Looking for more seasonal recipes? Don’t miss our banana wafer pudding for a southern twist on cozy comfort!
PrintWinter Wonderland Cake
Create a magical Winter Wonderland Cake for your holiday celebrations. This stunning dessert features fluffy layers, snowy frosting, and festive decorations, making it the perfect centerpiece for any winter gathering.
- Prep Time: 30 minutes
- Cook Time: 30 minutes
- Total Time: 1 hour
- Yield: 12 servings
- Category: Dessert
- Method: Baking
- Cuisine: American
- Diet: Vegetarian
Ingredients
For the Cake Layers:
- 2 ½ cups all-purpose flour
- 2 ½ tsp baking powder
- ½ tsp salt
- 1 cup unsalted butter, softened
- 2 cups granulated sugar
- 4 large eggs
- 1 cup whole milk
- 2 tsp vanilla extract
For the Frosting:
- 16 oz cream cheese, softened
- ½ cup unsalted butter, softened
- 4 cups powdered sugar
- 2 tsp vanilla extract
For Decoration:
- 1 cup shredded coconut (for a snowy effect)
- Edible glitter
- Edible pearls
- Fondant snowflakes or trees
Instructions
- Preheat your oven to 350°F (175°C). Grease and line two 9-inch round cake pans.
- In a large bowl, sift together the flour, baking powder, and salt. Set aside.
- In another bowl, cream the butter and sugar until light and fluffy. Add the eggs one at a time, mixing well after each addition.
- Mix in the vanilla extract. Gradually add the dry ingredients and milk, alternating between the two, until the batter is smooth.
- Divide the batter evenly between the prepared pans. Bake for 25–30 minutes or until a toothpick inserted into the center comes out clean. Cool completely before frosting.
- For the frosting, beat the cream cheese and butter together until smooth. Gradually add powdered sugar and vanilla extract. Chill for 15 minutes to thicken.
- Frost the cake layers, smoothing the edges and top. Press shredded coconut onto the frosting for a snowy look. Decorate with edible glitter, pearls, and fondant snowflakes.
Notes
- Storage: Keep the cake in an airtight container in the refrigerator for up to 5 days. Freeze leftover slices by wrapping them in plastic wrap and storing in a freezer-safe container for up to 3 months.
- Pro Tip: Chill the cake layers before frosting to prevent crumbs from mixing with the frosting.