Banana pudding is more than just a Southern staple—it’s one of those feel-good, nostalgia-packed desserts that brings people together. Whether you’re making it for Sunday dinner, a potluck, or just craving something sweet and creamy on a weeknight, banana pudding always delivers. In this blog post, we’re diving deep into what makes banana pudding so beloved, how to make it from scratch, fun variations, and tips to perfect it every time. We’ll also answer your most frequently asked questions and show you how to make it fit various dietary needs.
Looking for inspiration? Try our Pineapple Upside Down Cake for another classic dessert twist.
Now, let’s start with the sweet origin of banana pudding and why it still holds a special place on America’s dessert tables.
Introduction to Banana Pudding
What is Banana Pudding?
Banana pudding is a layered dessert made with sliced bananas, vanilla pudding or custard, and vanilla wafers (or ladyfingers), usually topped with whipped cream or meringue. It’s chilled until the flavors melt together into a creamy, decadent bite of nostalgia. While the ingredients are simple, the flavor is anything but.
This classic dessert has stood the test of time for one reason: it’s easy to make, requires minimal ingredients, and tastes like comfort in a bowl.
Why Banana Pudding is a Classic Dessert in America
There’s just something about the smoothness of pudding, the sweetness of bananas, and the softness of vanilla wafers that hits all the right notes. Popularized in the South in the mid-1900s, banana pudding quickly became a dessert-table regular at family reunions, church potlucks, and summer cookouts.
Unlike many elaborate baked goods, banana pudding doesn’t need an oven. That made it a favorite during the warmer months, especially before central air was common in Southern homes. Over time, different households added their own twist—some layering with meringue, others going the whipped cream route.
Today, it’s a dessert that bridges generations and gives us all a taste of something sweet, simple, and nostalgic.
Brief Overview of Its Southern Roots and Popularity
Banana pudding didn’t originate in the South—but it sure found its home there. While bananas were first imported to the U.S. in the late 1800s, it wasn’t until the early 20th century that recipes for banana pudding started appearing in cookbooks.
The real boom came when Nabisco began marketing Nilla Wafers in the 1940s, and their banana pudding recipe printed on the box became the go-to version. It spread like wildfire across Southern kitchens, passed down through generations, each family tweaking it just a bit.
You’ll now find it at diners, barbecue joints, church potlucks, and anywhere soul food reigns.
Key Ingredients for Making Banana Pudding
Traditional Ingredients You’ll Need
To make the best banana pudding, you’ll want to stick with tried-and-true ingredients that create that silky-smooth texture and old-fashioned flavor. Here’s what you’ll typically need:
| Ingredient | Purpose |
|---|---|
| Ripe Bananas | Natural sweetness + soft texture |
| Whole Milk | Creaminess and rich flavor |
| Eggs | Used in homemade custard recipes |
| Cornstarch or Flour | Thickens the pudding base |
| Sugar | Sweetens the custard |
| Vanilla Extract | Classic warm flavor enhancement |
| Nilla Wafers | Base and texture in every layer |
| Whipped Cream or Meringue | Light topping that finishes it off |
This combination creates the signature taste people expect from homemade banana pudding.
Don’t miss our Salmon Patties Recipe for a savory comfort dish to pair with this sweet treat!
Variations: Homemade vs Instant Pudding Mix
While homemade banana pudding made from scratch has unbeatable texture and flavor, not everyone has the time. Here’s how the two compare:
| Type | Pros | Cons |
|---|---|---|
| Homemade Custard | Rich, creamy, no additives | Takes longer, needs cooking |
| Instant Pudding Mix | Quick, convenient, no-cook option | Less flavor depth, can be thin |
If you’re using boxed pudding, choose vanilla or banana cream flavors, and add a splash of real vanilla extract to deepen the taste. You can also blend in a bit of sweetened condensed milk for extra richness.
Pro Tip: If time is tight, try layering the pudding while it’s still warm to help the wafers soften faster.
Choosing the Right Bananas: Ripeness Matters
The key to getting that sweet, banana-forward flavor is using just-right ripe bananas—not too green, not too mushy.
How to Choose:
- Look for bananas with yellow skin and a few brown spots.
- Avoid green bananas (they’re too starchy) or completely black ones (they’ll turn mushy fast).
- Peel and slice right before layering to prevent browning.
Tip: For a bit of extra flavor, toss banana slices with a splash of lemon juice or pineapple juice to keep them fresh-looking longer without affecting the flavor too much.
Step-by-Step Banana Pudding Recipe (From Scratch)
Preparing the Pudding Mixture
Making banana pudding from scratch isn’t hard, but it does require a little attention to detail. Here’s how to get that rich, velvety texture that store-bought just can’t compete with.
Ingredients for Homemade Custard Base:
- 2 cups whole milk
- 3 egg yolks
- 1/3 cup sugar
- 2 tablespoons cornstarch
- 1/4 teaspoon salt
- 1 teaspoon vanilla extract
- 1 tablespoon butter
Instructions:
- Heat the milk in a medium saucepan over medium heat until it’s steaming but not boiling.
- In a separate bowl, whisk egg yolks, sugar, cornstarch, and salt until smooth.
- Slowly pour a bit of the warm milk into the egg mixture (this tempers the eggs), whisking constantly.
- Return the mixture to the saucepan. Cook on medium heat, stirring constantly, until it thickens (about 6–8 minutes).
- Remove from heat, stir in vanilla extract and butter. Let it cool slightly.
This custard will form the luscious base that pulls the entire dessert together.
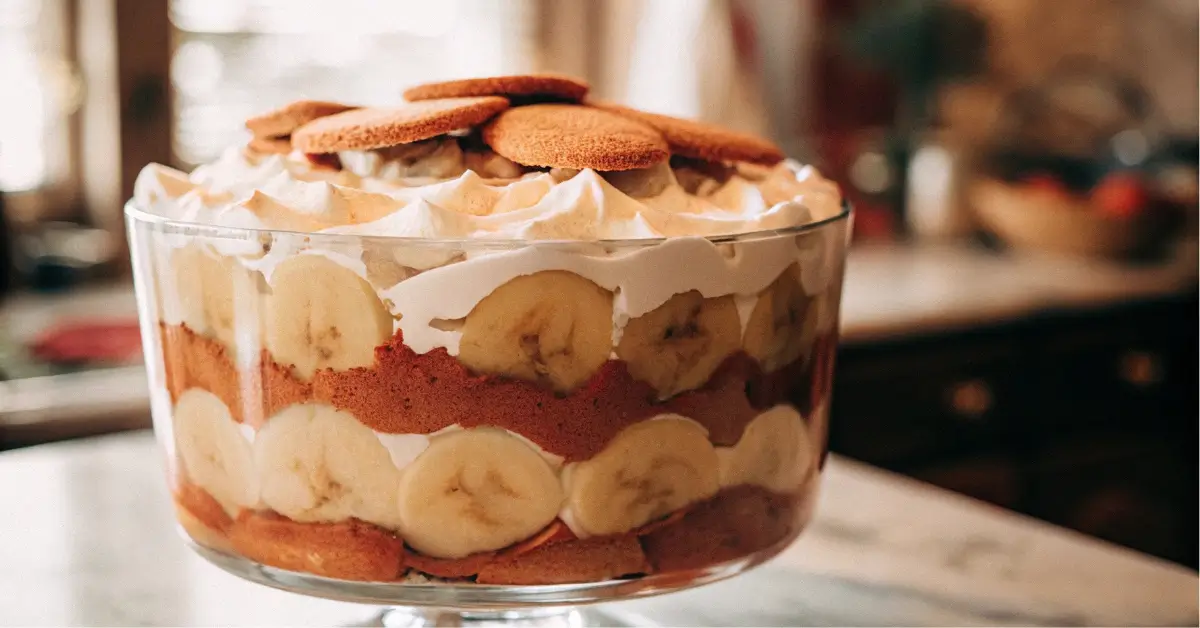
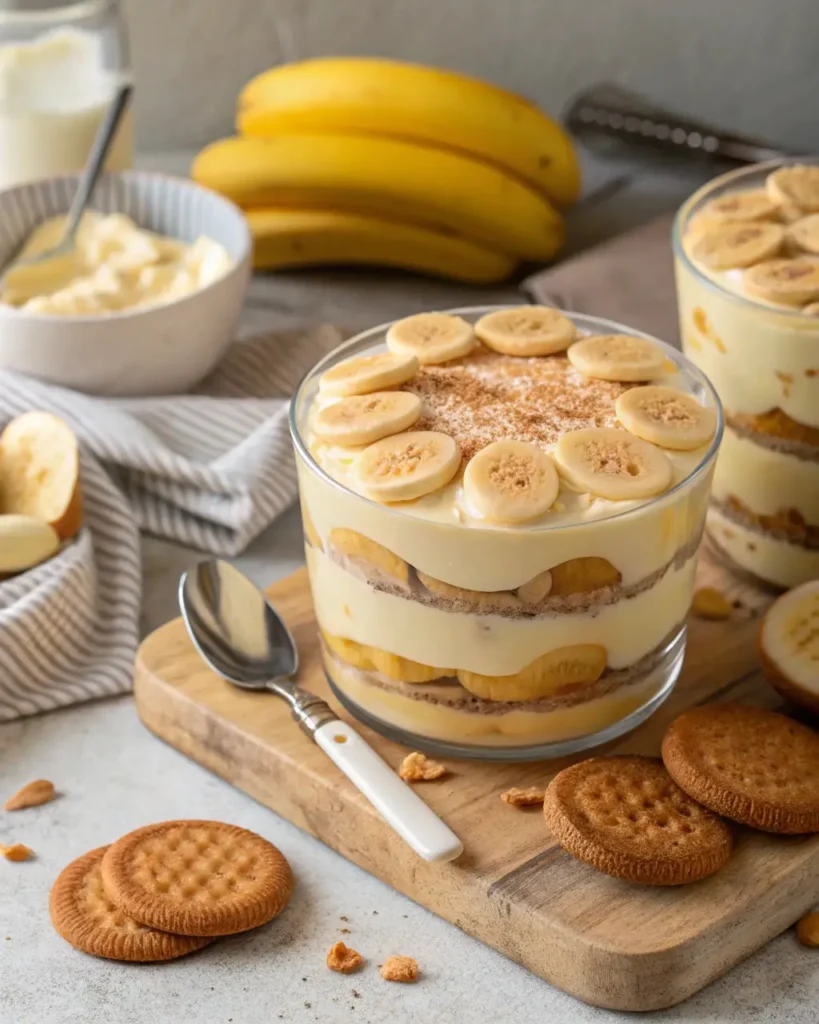
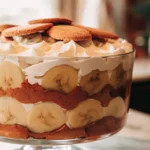
Layering with Nilla Wafers, Sliced Bananas & Custard
Now comes the fun part: building your banana pudding masterpiece. Whether you’re serving it in a trifle bowl, a 9×13 dish, or individual mason jars, the layering is where flavor meets texture.
Step-by-Step Layering:
- Line the bottom of your dish with Nilla Wafers.
- Add a layer of sliced bananas (about ¼ inch thick).
- Spoon over a layer of warm pudding.
- Repeat the layers—wafers, bananas, pudding—until you reach the top.
- Finish with a layer of whipped cream or meringue.
Tip: Press plastic wrap directly on the surface of the pudding if you’re not topping it immediately—this prevents a skin from forming.
Chilling Time: How Long is Ideal?
Banana pudding tastes best after it’s had time to chill and set. This allows the wafers to absorb the custard and soften into a cake-like texture while the flavors deepen.
- Minimum Chill Time: 4 hours
- Ideal Chill Time: Overnight (8–12 hours)
- Maximum Time: Up to 48 hours before bananas get mushy
Looking for more comfort food ideas? Check out our Recent Recipes Blog for the latest dishes Amelia is serving up.
Once chilled, you’ve got a dessert that’s creamy, flavorful, and ready to win hearts.
Best Banana Pudding Variations to Try
Banana Pudding with Cream Cheese Twist
Want a thicker, richer pudding with a cheesecake-like vibe? Add cream cheese to the mix. This version is super popular at potlucks and gets rave reviews from guests.
How to Make It:
- Beat together 8 oz of softened cream cheese with 1/2 cup of sweetened condensed milk.
- Fold that into your cooled pudding or instant vanilla pudding mix.
- Add whipped topping for a light, fluffy texture.
This version gives you a tangy boost while keeping the banana-forward flavor intact. It’s especially great for layered dessert bars or party trays.
Vegan Banana Pudding (Dairy-Free Delight)
Cutting out dairy? No problem. Banana pudding can still be creamy and delicious without milk or eggs.
Dairy-Free Substitutes:
| Traditional Ingredient | Vegan Alternative |
|---|---|
| Whole Milk | Almond or Oat Milk |
| Eggs | Cornstarch + Coconut Cream |
| Nilla Wafers | Vegan vanilla cookies |
| Whipped Cream | Coconut Whip or Cashew Cream |
Be sure to use very ripe bananas for maximum sweetness. You can even swap in agave or maple syrup instead of sugar if you’re cutting refined sugar too.
Pro Tip: Let your plant-based pudding cool fully before layering—it’ll thicken better and hold structure.
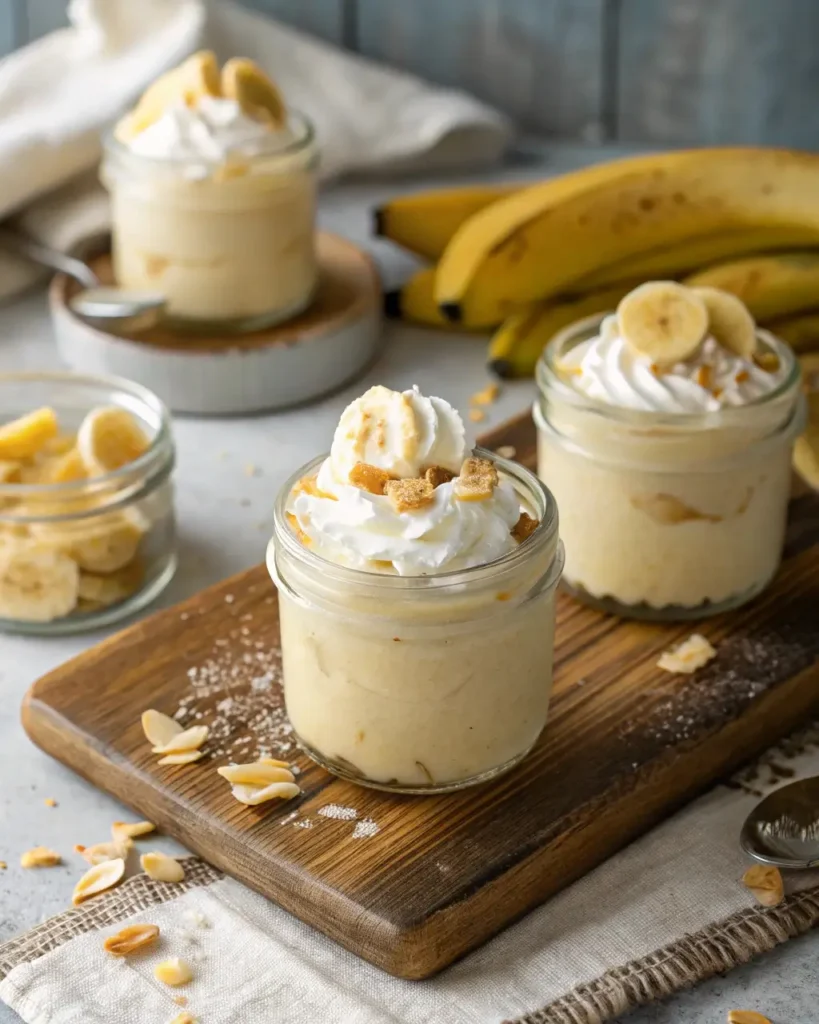
Banana Pudding Trifle & No-Bake Banana Pudding Cups
Want an easy serving option for parties or gatherings? Layer banana pudding in individual jars or cups for a no-mess, no-fuss dessert.
Try These Serving Ideas:
- Banana Pudding Trifle: Use a glass trifle bowl to showcase beautiful, visible layers of banana slices, pudding, and wafers.
- Mini Pudding Cups: Use small mason jars or disposable dessert cups—perfect for parties or kid-friendly servings.
- Banana Pudding Parfaits: Alternate pudding with whipped cream and banana slices, topped with cookie crumbs.
You can even make a no-bake version by skipping the stove and using instant pudding. Quick, chilled, and still impressive!
Discover great ideas like our Pineapple Upside Down Cake for another twist on classic desserts!
Expert Tips for Perfect Banana Pudding Every Time
Preventing Bananas from Browning
One of the biggest struggles when making banana pudding is keeping those banana slices from turning brown and ruining the look of your dish.
Here’s how to slow that down without messing up the flavor:
Top Tips to Prevent Browning:
- Lightly coat banana slices with lemon juice (use a pastry brush or toss them gently).
- For a milder taste, use pineapple or orange juice as an alternative.
- Slice the bananas right before layering—don’t prep them hours in advance.
- Make sure your pudding is cool enough before layering—warm pudding can speed up oxidation.
Keeping the banana slices hidden between layers also helps limit air exposure.
Keeping the Wafers from Getting Too Soggy
Nobody wants mushy wafers before dessert hits the table. The trick is controlling the moisture timing and balance.
How to Keep That Signature Texture:
- Use firm Nilla Wafers or even crisp ladyfingers if you prefer extra bite.
- Add your pudding while still warm—but not hot—to let the wafers soften just enough without becoming mush.
- Don’t overdo the pudding layers. A light touch helps maintain cookie texture longer.
- Chill for 4–12 hours max if you want to keep some wafer crispness. Longer chill = softer wafers.
If you’re serving the pudding the same day, use less pudding between layers to retain more crunch.
Making It Ahead for Parties or Potlucks
Banana pudding is a star make-ahead dessert—if done right. Here’s how to prep it ahead without sacrificing freshness or presentation.
Pro Prep Tips:
- Assemble the full pudding the night before and store in the fridge tightly wrapped.
- Wait to add whipped cream topping until just before serving.
- For extra freshness, add banana slices only to the middle layers, and decorate the top with freshly sliced bananas before serving.
Want to wow your guests? Use a trifle dish with visible layers and top with crushed cookies, mint leaves, or even drizzled caramel.
Serving Ideas & Pairings
How to Present Banana Pudding for Guests
Banana pudding isn’t just delicious—it can also be downright beautiful when served the right way. Whether you’re hosting a dinner party, showing off at a BBQ, or prepping for a potluck, presentation makes all the difference.
Serving Ideas That Wow:
- Trifle Bowl Showstopper: Use a clear trifle bowl to display every luscious layer—wafers, bananas, pudding, and whipped topping. Bonus: It feeds a crowd.
- Mini Mason Jars or Dessert Cups: Perfect for parties, potlucks, or portion control. Plus, they’re portable and easy to stack in the fridge.
- Parfait Glasses: Fancy up your presentation for a dinner party or date night by layering in tall glasses with long dessert spoons.
- Sheet Pan Pudding: Serve in a 9×13 baking dish for quick slicing and scooping—great for family-style meals.
Styling Tips:
- Garnish with crushed vanilla wafers, banana slices, or even fresh mint for contrast.
- Drizzle caramel or chocolate sauce on top for an elevated twist.
Best Drinks & Sides to Pair With It
Banana pudding is rich, creamy, and sweet—so the perfect pairings are often refreshing, tangy, or nutty to balance things out.
Drink Pairings:
| Type | Examples |
|---|---|
| Coffee | Cold brew, espresso, or caramel latte |
| Tea | Sweet tea, chai latte, or green tea |
| Boozy Options | Bailey’s on ice, dessert wines, bourbon |
Side Pairings:
- Fresh berries like strawberries or raspberries (cut the sweetness!)
- Roasted or honey-glazed nuts for crunch
- A salty cheese board if you’re turning dessert into an event
Creative Toppings: Crushed Nuts, Caramel Drizzle, Coconut Flakes
Level up your banana pudding game with toppings that add crunch, flavor, or a surprise twist.
Top Banana Pudding Toppings:
- Crushed pecans or walnuts – adds crunch and nuttiness
- Caramel sauce drizzle – enhances the banana flavor with buttery richness
- Toasted coconut flakes – brings a tropical vibe to the dish
- Dark chocolate shavings – for an indulgent finish
- Mini marshmallows – especially fun for kids or holidays
Don’t miss our Pineapple Upside Down Cake for another impressive dessert that’s perfect for sharing.
Banana Pudding for Special Diets
Gluten-Free Banana Pudding Options
Traditional banana pudding uses Nilla Wafers, which contain gluten. But that doesn’t mean gluten-sensitive folks have to miss out.
Easy Gluten-Free Swaps:
- Use gluten-free vanilla cookies or ladyfingers (look for brands like Schär or Kinnikinnick).
- Double-check your pudding mix or custard base ingredients—cornstarch is typically safe, but pre-made mixes may contain thickeners with gluten.
- Layer the pudding with gluten-free graham crackers for a different twist with a nice crunch.
Extra Tip: Always label your dish clearly at potlucks to let guests with sensitivities know it’s gluten-free.
Low-Sugar or Keto-Friendly Banana Pudding
If you’re watching your sugar intake or following a keto diet, banana pudding can still be part of your plan—with just a few adjustments.
Keto-Friendly Ingredient Swaps:
| Traditional | Keto/Low-Sugar Alternative |
|---|---|
| Sugar | Stevia, erythritol, or monk fruit |
| Whole milk | Unsweetened almond or coconut milk |
| Nilla wafers | Keto cookies or crushed almonds |
| Bananas | Use fewer bananas (or banana extract for flavor) |
Bananas are higher in natural sugars, so for strict keto, use banana extract and fold in chopped zucchini (trust us, it blends in) or avocado pudding for a mock version with fewer carbs.
Tip: Focus on rich textures and flavor boosts like cinnamon or nutmeg to keep things satisfying even with fewer sweeteners.
Tips for Allergen-Friendly Substitutes
Whether you’re dealing with dairy, eggs, or nuts—banana pudding can be tailored for allergy-sensitive diets too.
Allergy Modifications:
- Dairy-Free: Use oat milk or coconut milk for the base, and swap whipped cream for a plant-based alternative like coconut whip.
- Egg-Free: Use a pudding mix that doesn’t require eggs or thicken with cornstarch alone for a smooth, creamy custard.
- Nut-Free: Skip almond/coconut toppings or sauces. Stick to traditional wafers and classic banana-custard layers.
Bonus Idea: Use sunflower seed butter drizzle for a nut-free crunch that brings a bit of savory contrast.
Looking for more healthy spins on comfort food? Discover great ideas like our Recent Posts Collection featuring better-for-you favorites.
Storage and Shelf Life of Banana Pudding
Refrigeration Tips: How Long Does Banana Pudding Last?
Banana pudding holds up well in the fridge, but its shelf life depends on a few key factors—like the freshness of your bananas and whether you used homemade or instant pudding.
General Guidelines:
- Freshly made banana pudding lasts about 3 to 4 days in the fridge.
- Store it in an airtight container to keep odors out and texture in.
- If you’re using whipped cream or meringue topping, apply it just before serving for best results.
Quick Tip: Press a piece of plastic wrap directly onto the pudding’s surface to prevent it from forming a skin and reduce oxidation of the bananas.
| Storage Method | Shelf Life |
|---|---|
| Fridge (airtight container) | 3–4 days |
| Fridge (trifle bowl with plastic wrap) | 2–3 days |
| With bananas on top | 1–2 days (bananas brown quickly) |
Can You Freeze Banana Pudding? Pros & Cons
Freezing banana pudding is possible, but not always ideal—especially if you’re using fresh bananas or whipped cream.
Pros:
- Works best with a thicker, custard-style pudding (not instant).
- Extends shelf life up to 1 month.
Cons:
- Bananas may become mushy and dark after thawing.
- Wafers lose their texture, turning soggy.
Freezing Tips:
- Portion it into individual containers for easier thawing.
- Wrap tightly with plastic wrap and foil to prevent freezer burn.
- Thaw in the fridge overnight, not at room temperature.
Signs It’s Gone Bad
Not sure if your banana pudding is still good? Here’s what to watch out for:
- Dark brown bananas with an overly slimy texture.
- Sour smell or a separation of layers.
- Watery pudding that no longer holds its shape.
If in doubt, toss it out—better safe than sorry when it comes to dairy-based desserts.
Don’t miss our delicious classics like Pineapple Upside Down Cake to explore other fruit-forward desserts.
Frequently Asked Questions (FAQs)
Can banana pudding be made a day ahead?
Absolutely! In fact, banana pudding is often better the next day. Letting it chill overnight gives the flavors time to meld and allows the wafers to soften into a cake-like layer. Just wait to add any fresh banana slices or whipped topping until right before serving for the freshest look and texture.
What keeps bananas from turning brown in banana pudding?
To keep bananas looking fresh:
Lightly coat slices with lemon or pineapple juice.
Slice right before layering to reduce exposure to air.
Keep them buried between layers of pudding and wafers to limit oxygen exposure.
These tricks help slow oxidation without affecting the flavor too much.
Is banana pudding better warm or cold?
Traditionally, banana pudding is served cold after chilling for several hours or overnight. Chilling gives it that signature creamy texture and flavor harmony. That said, some people love it slightly warm—especially if topped with meringue and baked briefly.
Can I freeze banana pudding with bananas in it?
You can, but it’s not ideal. Bananas tend to turn dark and mushy when frozen, and the texture of the pudding may separate upon thawing. If you do freeze it, portion it out and wrap tightly. Thaw in the refrigerator for best results—but expect a softer, less pretty dessert.
What’s the best type of wafer for banana pudding?
Nilla Wafers are the classic choice, offering a light vanilla flavor and the perfect texture after chilling. You can also try:
Shortbread cookies for a richer bite.
Ladyfingers for more structure.
Gluten-free vanilla cookies for dietary needs.
How long does banana pudding stay fresh in the fridge?
Banana pudding stays fresh in the fridge for about 3–4 days. For best results:
Store in an airtight container.
Keep sliced bananas covered with pudding layers.
Add whipped cream topping just before serving.
After day 2, the bananas may begin to brown slightly, but it’ll still taste great.
Conclusion
Banana pudding isn’t just a dessert—it’s a feeling. Whether you like it homemade from scratch or quick and easy with instant mix, this timeless Southern favorite brings creamy, sweet, comforting flavor in every bite. From fresh bananas to layered wafers and velvety custard, it’s a no-fail treat for family dinners, BBQs, or whenever your sweet tooth calls.
We’ve covered how to make it, switch it up for dietary needs, store it properly, and make it look amazing on the table. Now it’s your turn to whip it up and taste the tradition.
Don’t miss our Recent Recipes for more dessert inspiration like banana pudding!
Have a favorite twist or topping you use for your pudding? Share it in the comments—we’d love to hear how you make it your own.
PrintBest Banana Pudding Recipe: Creamy, Classic & Irresistibly Easy
This creamy, dreamy banana pudding recipe layers vanilla custard, fresh bananas, and Nilla Wafers for the ultimate no-bake Southern dessert. It’s easy to prepare and perfect for make-ahead entertaining or family comfort food.
- Prep Time: 20 minutes
- Cook Time: 8 minutes
- Total Time: 28 minutes
- Yield: 8–10 servings
- Category: Dessert
- Method: No-Bake (with stove-top custard preparation)
- Cuisine: Southern American
- Diet: Vegetarian
Ingredients
- 2 cups whole milk
- 3 large egg yolks
- 1/3 cup granulated sugar
- 2 tablespoons cornstarch
- 1/4 teaspoon salt
- 1 teaspoon vanilla extract
- 1 tablespoon unsalted butter
- 3–4 ripe bananas, sliced
- 1 box Nilla Wafers (or gluten-free vanilla cookies)
- 1 cup whipped cream or topping of choice
Instructions
- In a medium saucepan, heat the milk over medium heat until steaming but not boiling.
- In a mixing bowl, whisk together the egg yolks, sugar, cornstarch, and salt until smooth.
- Slowly add a bit of the hot milk to the egg mixture to temper, then return everything to the saucepan.
- Stir constantly over medium heat until the mixture thickens into a pudding consistency (6–8 minutes).
- Remove from heat and stir in the vanilla extract and butter. Let it cool slightly.
- In a trifle bowl or baking dish, start layering: wafers, banana slices, and warm pudding.
- Repeat the layers until ingredients are used up, ending with pudding on top.
- Cover and chill for at least 4 hours or overnight.
- Before serving, top with whipped cream and garnish with crushed wafers or banana slices.
Notes
- Use slightly overripe bananas for the sweetest flavor.
- For vegan variation, replace milk with oat or almond milk and use a cornstarch-only thickening base.
- This dessert is best served cold but can be eaten slightly warm for a nostalgic Southern-style twist.