Craving a hearty, flavorful dinner that everyone in the family will love? Look no further than Cheeseburger Pockets — the ultimate blend of juicy beef, gooey cheese, and golden pastry wrapped into one delicious, hand-held meal. Whether you’re meal prepping for the week, packing school lunches, or whipping up a cozy dinner on a busy weeknight, these savory pockets deliver big flavor with minimal fuss.
Cheeseburger Pockets are a game-changer: they’re customizable, freezer-friendly, and totally satisfying. In this article, we’ll guide you through every step—from the ingredients you’ll need to storage tips that keep them fresh. You’ll also discover smart variations like spicy jalapeño or bacon-loaded versions, plus we’ll cover the most common questions about making, freezing, and serving these little bundles of joy.
Don’t miss our Sausage Egg and Cheese Breakfast Roll-Ups for another easy grab-and-go meal idea.
Let’s dive into what makes these cheesy pockets so special.
Jump to:
Why You’ll Love This Cheeseburger Pockets Recipe
What Makes Cheeseburger Pockets So Irresistible
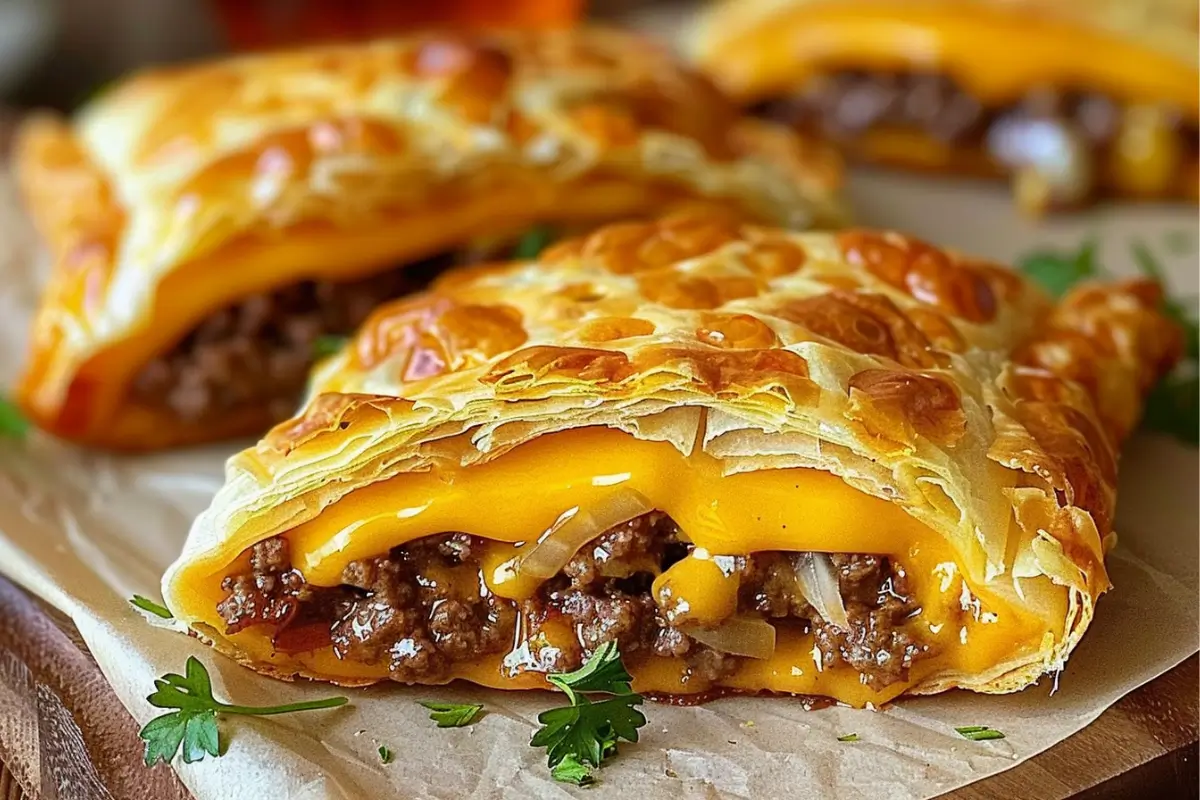
First off, the combination of seasoned ground beef and melty cheese wrapped in warm, fluffy dough is always a crowd-pleaser. Think of it as a handheld cheeseburger — but better. These Cheeseburger Pockets are oven-baked until golden brown, locking in juicy flavor with each bite. Plus, they’re portable, mess-free, and perfect for dipping in ketchup, mustard, or your favorite sauces.
Still not convinced? Here’s why home cooks swear by this recipe:
- Quick to prep and bake – Total time under 35 minutes
- Family-friendly – Kids love the mini sandwich style
- Customizable – Use different cheeses, sauces, or even veggie options
- Meal-prep friendly – Freeze before or after baking
- Minimal cleanup – One skillet and a baking sheet, done!
Family-Friendly, Freezer-Ready, and Perfect for Busy Weeknights
No time for complicated meals? These Cheeseburger Pockets come to the rescue. You can prep the filling in advance, use store-bought dough if needed, and keep extras frozen for busy nights. Just pop them in the oven and serve with a simple side salad or fries — dinner is ready in no time.
Check out Sweet Chili Halloumi Wraps for another flavor-packed dinner idea that’s quick and fun.
Whether you’re hosting a casual get-together or packing lunches, Cheeseburger Pockets fit the occasion. They’re a must-have in every busy cook’s rotation.
Preparation and Cooking Time for Cheeseburger Pockets
Total Time Breakdown (Prep, Bake, Cool)
One of the best things about making Cheeseburger Pockets at home is how little time they take from start to finish. This recipe is built for real life—busy schedules, weeknight dinners, or even a last-minute party snack.
Here’s a quick breakdown of what to expect:
| Task | Time Required |
|---|---|
| Prepping Ingredients | 10 minutes |
| Cooking Beef Filling | 10 minutes |
| Assembling Pockets | 10 minutes |
| Baking Time | 15–18 minutes |
| Cooling & Serving | 5 minutes |
| Total Time | ~35–40 min |
If you’re using store-bought dough or prepping the beef filling ahead of time, you could easily shave off another 10 minutes, making this a 30-minute dinner winner.
Ideal Time-Saving Tips for a Quick Dinner
We all need a few shortcuts, right? Good news: Cheeseburger Pockets lend themselves perfectly to quick hacks that don’t sacrifice flavor.
Here’s how to save time and still get that homemade touch:
- Use refrigerated biscuit or crescent roll dough – no kneading, no mess
- Brown your beef ahead of time – store it in the fridge or freeze for later
- Cheese slices work great – skip shredding and just tear them into pieces
- Bake a double batch – freeze extras for future you (you’ll thank yourself)
Looking for inspiration? Try Cheesy Garlic Chicken Wraps for another fuss-free, flavorful family meal.
These time-savers make it totally doable to pull together Cheeseburger Pockets any night of the week—even when you’re running on fumes.
Ingredients for Cheeseburger Pockets
Core Ingredients You’ll Need
To make perfect Cheeseburger Pockets, you don’t need anything fancy—just a few pantry and fridge staples. Here’s your go-to list for the classic version:
| Ingredient | Amount | Notes |
|---|---|---|
| Ground beef (85/15 or 80/20) | 1 lb | Adds flavor and juiciness |
| Onion, finely chopped | ½ cup | Optional but highly recommended |
| Garlic powder | 1 tsp | Or use fresh minced garlic |
| Salt and black pepper | To taste | Season beef to your liking |
| Ketchup | 2 tbsp | Classic cheeseburger flavor |
| Mustard (yellow or Dijon) | 1 tbsp | Adds tang and depth |
| Shredded cheddar cheese | 1 to 1½ cups | Melts well and complements beef |
| Pre-made dough (crescent, pizza, or biscuit) | 1 can (8 count or 1 lb dough) | Crescent rolls give a flaky texture |
| Egg, beaten (for egg wash) | 1 | For golden brown finish |
These basics create that signature cheeseburger taste in every bite. And the dough? It’s the perfect handheld wrapper for all that cheesy beefy goodness.
Optional Add-Ins for Extra Flavor
Want to get creative with your Cheeseburger Pockets? Toss in some fun extras or switch up the seasoning to match your cravings.
Here are a few tasty add-ins:
- Crumbled bacon – smoky, salty, irresistible
- Diced pickles – adds crunch and classic burger flavor
- Sautéed mushrooms – for a savory twist
- American cheese – melts super smoothly for extra gooeyness
- Spicy jalapeños – for a bit of heat
- BBQ sauce – gives it a smoky, tangy kick
Don’t miss our Bacon Cheeseburger Inspired Salisbury Steak for another hearty beef-and-cheese recipe you’ll love.
Mix and match your favorites—you can easily personalize each pocket to fit different taste buds at the table.
Step-by-Step Instructions for Cheeseburger Pockets
How to Prepare the Dough or Use Store-Bought
If you’re going the homemade route, prep a simple pizza or biscuit dough using flour, yeast, salt, sugar, and warm water. But honestly, when time’s tight, store-bought crescent roll or pizza dough works like a charm.
Here’s a quick guide:
- For crescent rolls: Separate the triangles and pinch edges together to make a rectangle.
- For biscuit dough: Flatten each round into a 4–5-inch circle using your hands or a rolling pin.
- For pizza dough: Divide and roll into even squares or circles, about ¼ inch thick.
Set your dough pieces aside while you prep the filling.
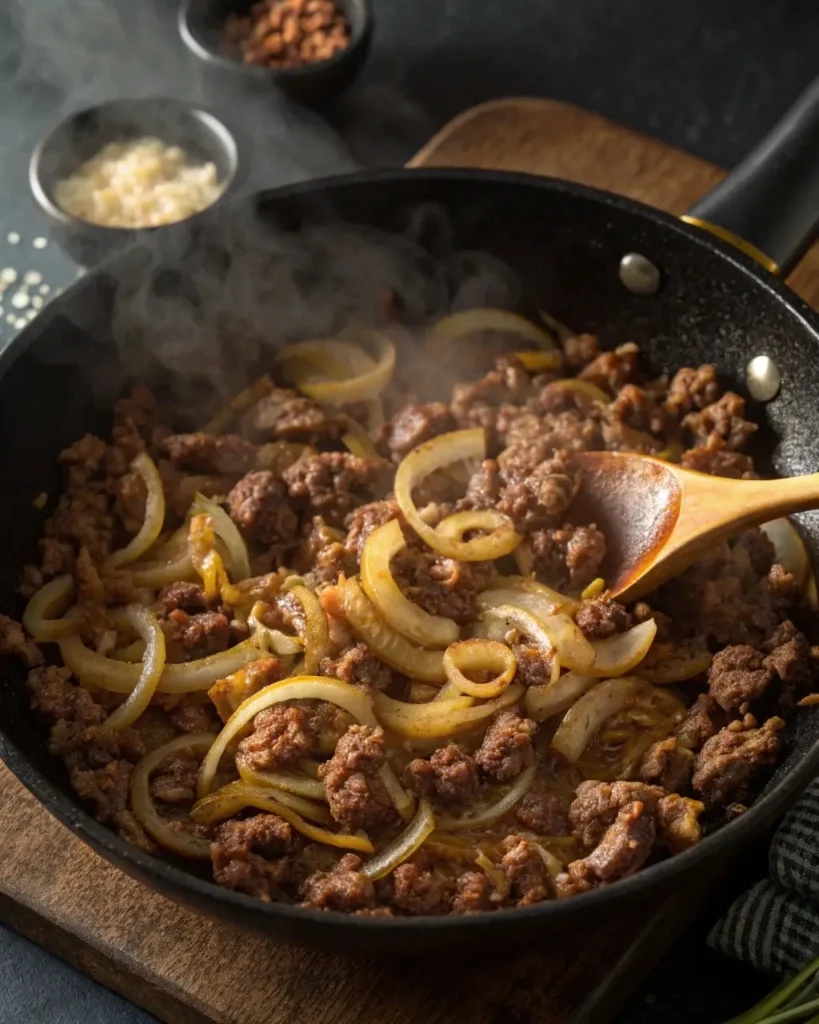
Cooking the Ground Beef Filling
This is where all the savory cheeseburger flavor comes in.
- Brown the ground beef in a skillet over medium heat. Break it up with a wooden spoon.
- Add chopped onions, garlic powder, salt, and pepper. Cook until the onions soften and the beef is fully cooked (about 8–10 minutes).
- Drain excess grease to avoid soggy pockets.
- Stir in ketchup and mustard to bring that classic burger vibe.
- Turn off the heat, then mix in shredded cheese until melty and combined.
This beefy, cheesy filling is the star of your Cheeseburger Pockets.
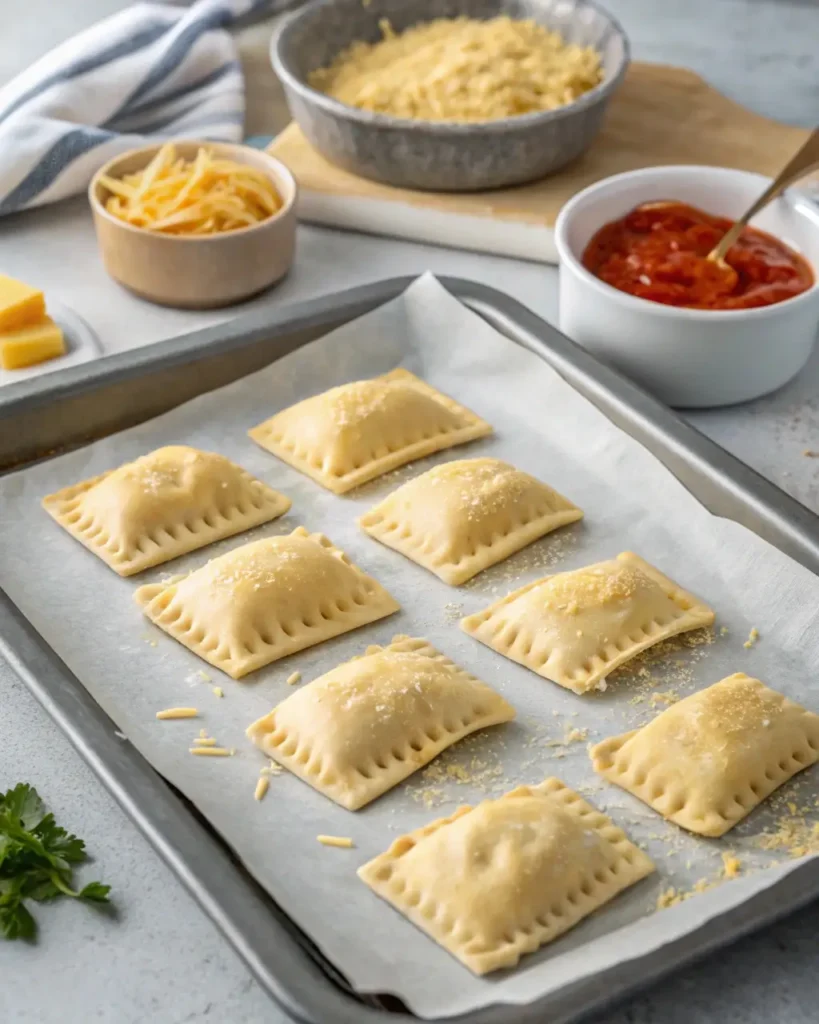
Assembling and Baking the Cheeseburger Pockets
Now, the fun part — bringing it all together.
- Preheat your oven to 375°F (190°C).
- Lay your dough rounds or rectangles on a baking sheet lined with parchment paper.
- Spoon about 2 tablespoons of beef mixture onto one side of the dough.
- Fold the dough over the filling and seal the edges by pressing with a fork.
- Brush the tops with beaten egg for a golden finish.
- Bake for 15–18 minutes, or until golden brown and puffed.
Let them cool for 5 minutes before serving — the filling will be piping hot!
Discover great ideas like Lavender Honey Cupcakes if you’re looking to add a sweet touch to dinner night.
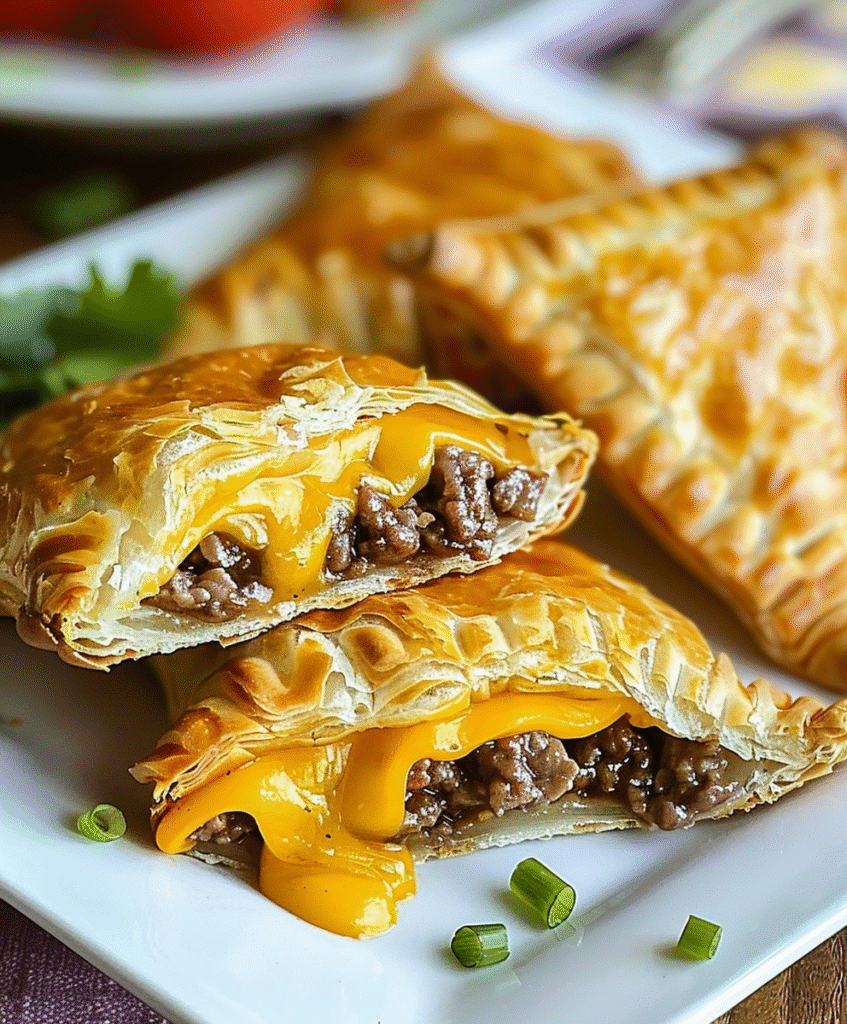
These Cheeseburger Pockets turn out flaky on the outside, cheesy and flavorful on the inside — perfect for dipping, stacking, or devouring straight off the tray.
How to Serve Cheeseburger Pockets
Best Side Dishes and Sauces
One of the best things about Cheeseburger Pockets is how versatile they are when it comes to sides. Whether you’re planning a casual family dinner or prepping for a game-day party, the right pairing can elevate the entire experience.
Here are some perfect sides to round out your meal:
| Side Dish | Why It Works |
|---|---|
| Crispy French Fries | A classic combo — like a drive-thru upgrade |
| Sweet Potato Wedges | Adds a hint of sweetness and balances the salt |
| Side Salad (ranch or vinaigrette) | Lightens things up |
| Coleslaw | Adds a refreshing crunch |
| Roasted Veggies | For a more wholesome, veggie-packed plate |
When it comes to dipping, the options are endless. Try:
- Classic ketchup or mustard
- Spicy sriracha mayo
- Creamy ranch dressing
- Homemade burger sauce (mayo, ketchup, relish, vinegar)
- BBQ sauce for a smoky kick
These additions take your Cheeseburger Pockets from good to unforgettable.
Creative Plating for Kids and Parties
Want to impress the little ones or serve something fun for guests? A few presentation tweaks can go a long way.
Here are some creative ideas:
- Mini Cheeseburger Pockets: Use smaller dough pieces for bite-sized snacks. Perfect for kids or party platters.
- Burger Bar Style: Serve pockets with an array of sauces in small ramekins.
- Cut into halves or wedges: Showcase the melty cheese and beef inside.
- Add fun picks or flags for themed parties or kids’ lunchboxes.
Looking for inspiration? Try Mini Peanut Butter Cup Cheesecakes as a fun and sweet bite-sized dessert to pair.
So whether you’re keeping things casual or getting a little fancy, Cheeseburger Pockets serve up well with style, simplicity, and tons of flavor.
Additional Tips for Perfect Cheeseburger Pockets
Avoiding Common Mistakes (Like Soggy Bottoms)
Even simple recipes like Cheeseburger Pockets can go sideways if a few key steps are skipped. Here’s how to avoid the most frequent pitfalls and ensure your pockets are crispy, flavorful, and fully cooked.
Watch out for these mistakes:
- Too much filling – Overstuffing leads to leaks and dough that won’t seal. Stick to 2 tablespoons max.
- Skipping the egg wash – This golden glaze helps the dough brown and adds flavor.
- Not draining beef fat – Greasy filling creates soggy pockets. Always drain excess fat from the skillet.
- Cold dough – If using refrigerated dough, let it warm slightly so it’s pliable and easy to fold.
- Not preheating the oven – A hot oven ensures even cooking and crisp edges.
Ingredient Swaps and Flavor Boosters
Want to give your Cheeseburger Pockets a unique spin? Try a few of these simple upgrades to elevate flavor without complicating the process.
Tasty ingredient swaps:
| Standard Ingredient | Swap Option | Flavor Twist |
|---|---|---|
| Cheddar cheese | Pepper Jack or Swiss | Adds heat or nutty notes |
| Ground beef | Ground turkey or chicken | A leaner, lighter version |
| Crescent roll dough | Puff pastry | Extra flaky and buttery |
| Ketchup + mustard combo | BBQ sauce or sriracha | Bold, smoky, or spicy |
Flavor boosters to try:
- Add a dash of smoked paprika or Worcestershire sauce to the beef while cooking.
- Sprinkle the tops with sesame seeds or everything bagel seasoning before baking.
- Mix in chopped green onions or a hint of chili powder for added depth.
Don’t miss our Cheesy Chicken Sloppy Joe Recipes for more ideas on amped-up handheld meals.
Little tweaks like these can make your Cheeseburger Pockets feel fresh and gourmet—without a ton of extra effort.
Recipe Variations for Cheeseburger Pockets
Bacon Cheeseburger Pockets
Take your Cheeseburger Pockets to the next level with crispy bacon bits folded right into the beef and cheese mixture. This variation is ideal for bacon lovers who want that smoky crunch with every bite.
How to make it:
- Cook 4–6 strips of bacon until crisp.
- Crumble and stir into your beef mixture just before adding the cheese.
- You can even sprinkle a few bacon bits on top before sealing the dough.
Why it works: Bacon adds salt, fat, and texture—making your Cheeseburger Pockets taste like a deluxe fast-food burger baked into golden pastry.
Spicy Jalapeño Cheeseburger Pockets
Love a little heat? Add fresh or pickled jalapeños to the mix. You can also spice things up with Pepper Jack cheese or a drizzle of hot sauce.
How to make it spicy:
- Dice jalapeños and add to the beef while it cooks, or place slices directly on the cheese before sealing the dough.
- Substitute cheddar for Pepper Jack or Monterey Jack with chili flakes.
- Mix a teaspoon of hot sauce into the ketchup-mustard blend.
Why it works: Jalapeños give your pockets a zesty kick, and when paired with creamy cheese, they strike the perfect spicy-smooth balance.
Vegetarian or Vegan Alternatives
For a plant-based twist, Cheeseburger Pockets can easily be adapted using meatless and dairy-free options without losing the essence of comfort food.
How to veganize it:
- Use plant-based ground beef (like Beyond Meat or lentil-walnut crumbles).
- Swap cheddar for dairy-free cheese that melts well.
- Ensure the dough is vegan-friendly (some crescent rolls and pizza doughs are).
You can even add sautéed mushrooms, grilled onions, or spinach for a wholesome veggie-loaded variation.
Looking for more meatless magic? Don’t miss our Tzatziki Chickpea Salad — it’s refreshing, filling, and completely vegetarian.
These creative spins prove just how flexible Cheeseburger Pockets can be, whether you’re craving smoky, spicy, or meatless goodness.
Freezing and Storage Instructions for Cheeseburger Pockets
How to Freeze and Reheat Without Losing Texture
One of the biggest reasons Cheeseburger Pockets have become a family favorite is how well they freeze. Whether you want to prep ahead or save leftovers, freezing is the way to go.
To freeze before baking:
- Assemble the pockets as usual but do not bake.
- Place them in a single layer on a parchment-lined baking sheet.
- Freeze for 2–3 hours, then transfer to a zip-top freezer bag.
- Label with the date and bake-by deadline (best within 2 months).
To bake from frozen:
- Preheat oven to 375°F (190°C).
- Place frozen pockets on a lined baking sheet.
- Bake for 22–25 minutes, or until golden brown and heated through.
To freeze after baking:
- Let pockets cool completely.
- Wrap individually in foil or plastic wrap.
- Store in a freezer bag for up to 3 months.
To reheat:
- Reheat in a 350°F oven for 10–15 minutes.
- Avoid the microwave if you want to keep that crisp, flaky texture.
Looking for inspiration? Try Air Fryer Ribs Recipe for another freezer-friendly crowd-pleaser.
Best Storage Containers and Shelf Life
If you’re storing leftovers in the fridge, here’s how to keep them fresh:
- Use airtight glass or BPA-free plastic containers.
- Store in a single layer to prevent squishing.
- Keep in the refrigerator for up to 4 days.
- Reheat in a toaster oven or conventional oven for best results.
Here’s a quick reference chart:
| Storage Method | Shelf Life | Reheating Notes |
|---|---|---|
| Fridge (airtight) | Up to 4 days | Oven or toaster oven for best texture |
| Freezer (unbaked) | 2 months | Bake straight from frozen, 25 mins @ 375°F |
| Freezer (baked) | 3 months | Thaw or reheat directly in oven |
With the right method, your Cheeseburger Pockets can go from freezer to table in under 30 minutes.
Special Equipment for Making Cheeseburger Pockets
Essential Tools for Easier Prep
While Cheeseburger Pockets don’t require a gourmet kitchen setup, a few simple tools can speed up the process and improve results. Here’s what we recommend:
| Tool | Why It’s Useful |
|---|---|
| Large nonstick skillet | For evenly browning ground beef without sticking |
| Wooden spoon or spatula | Helps break up beef and stir in fillings evenly |
| Rolling pin | Flattens dough circles for even pocket size |
| Pastry brush | Ideal for applying egg wash before baking |
| Baking sheet with parchment | Ensures even baking and easy cleanup |
| Fork | Seals pocket edges with that classic crimped look |
Each of these tools plays a role in making your Cheeseburger Pockets look as good as they taste.
Check out Banana Bread with Cake Mix for another easy recipe that benefits from just a few kitchen basics.
Budget-Friendly Alternatives
No fancy kitchen gear? No problem. Here are some creative swaps using everyday household items:
- No rolling pin? Use a wine bottle to flatten the dough.
- No pastry brush? Use the back of a spoon or a folded paper towel to brush on egg wash.
- No parchment paper? Use foil lightly greased with oil or butter.
- No baking sheet? A pizza pan or oven-safe tray will work just fine.
The key to great Cheeseburger Pockets isn’t gear — it’s the love (and cheese) you pack into each one.
Frequently Asked Questions About Cheeseburger Pockets
Can I freeze cheeseburger pockets before baking?
Yes, you absolutely can. In fact, freezing Cheeseburger Pockets before baking is a great way to meal prep. After assembling the pockets, freeze them on a baking sheet until firm, then transfer them to an airtight freezer-safe bag. When ready to bake, place them directly in a preheated oven at 375°F and bake for 22–25 minutes. No need to thaw!
How do I keep cheeseburger pockets from getting soggy?
The biggest culprits behind soggy Cheeseburger Pockets are greasy beef and unventilated baking. Make sure to drain excess fat from the cooked beef before mixing in your other ingredients. Use parchment paper and a well-preheated oven to help achieve a crisp, golden crust. Avoid overstuffing, and always seal the edges tightly to keep steam locked inside.
What’s the best cheese for cheeseburger pockets?
Cheddar is the classic choice—it melts well and pairs perfectly with ground beef. However, for a different flavor profile, you can try American cheese for creaminess, Pepper Jack for heat, or Swiss for a nuttier flavor. Any cheese that melts smoothly is a good fit for Cheeseburger Pockets.
Can I use crescent dough for this recipe?
Yes, crescent roll dough is a popular and convenient option for making Cheeseburger Pockets. It bakes up light, flaky, and buttery—an ideal match for the savory beef and cheese filling. Just be sure to pinch the seams well so the filling stays sealed during baking.
Are cheeseburger pockets kid-friendly?
Totally! These hand-held pockets are made for little hands. The soft dough, cheesy interior, and classic burger flavors make Cheeseburger Pockets a go-to for even picky eaters. Want to make it more fun? Let kids help with assembly—they can choose their own add-ins and sauces.
How long do leftover cheeseburger pockets last in the fridge?
When stored in an airtight container, leftover Cheeseburger Pockets will stay fresh in the refrigerator for up to 4 days. Reheat them in a toaster oven or conventional oven at 350°F for 10–12 minutes to restore their crisp texture. Avoid microwaving if you want to keep the dough from turning soft.
Conclusion
When it comes to quick, comforting meals that please a crowd, Cheeseburger Pockets hit all the right notes. They’re cheesy, hearty, and wrapped in golden dough that turns any night into a dinner win. With simple ingredients and easy prep, this recipe is tailor-made for busy weeknights, picky eaters, and anyone who loves the flavor of a classic cheeseburger in a fun, hand-held form.
From make-ahead freezer options to flavor-packed variations like spicy jalapeño or bacon-loaded, Cheeseburger Pockets are endlessly adaptable. Serve them with a crisp salad, a side of fries, or a trio of dipping sauces for a meal that’s anything but boring.
Whether you’re cooking for your kids, prepping game day snacks, or just craving a no-fuss comfort dish, this recipe delivers every time.
Don’t miss our Heavenly Boston Cream Pie Cheesecake if you’re in the mood to follow dinner with a dessert that impresses just as much.
So go ahead—save this recipe, try it out, and let those warm, cheesy pockets of joy make dinner delicious again.
PrintCheeseburger Pockets

Easy, cheesy, and ready in just 30 minutes, these homemade Cheeseburger Pockets are filled with juicy ground beef, melted cheese, and wrapped in golden flaky dough. Perfect for busy weeknights or freezer-friendly meal prep!
- Prep Time: 10 minutes
- Cook Time: 18 minutes
- Total Time: 28 minutes
- Yield: 8 servings
- Category: Dinner
- Method: Baked
- Cuisine: American
Ingredients
- 1 lb ground beef (80/20 preferred)
- ½ cup chopped onion
- 1 tsp garlic powder
- Salt and pepper, to taste
- 2 tbsp ketchup
- 1 tbsp mustard (yellow or Dijon)
- 1 to 1½ cups shredded cheddar cheese
- 1 can crescent roll dough (or pizza/biscuit dough)
- 1 egg, beaten (for egg wash)
Instructions
- Preheat oven to 375°F (190°C). Line a baking sheet with parchment paper.
- In a skillet, brown ground beef over medium heat. Add onions, garlic powder, salt, and pepper. Cook until beef is no longer pink and onions are soft. Drain excess grease.
- Stir in ketchup and mustard. Remove from heat and mix in shredded cheese.
- Roll out dough and cut into 8 rectangles or rounds.
- Spoon 2 tablespoons of filling onto each piece. Fold and seal edges with a fork.
- Place on baking sheet, brush with beaten egg.
- Bake 15–18 minutes or until golden brown. Cool slightly before serving.
Notes
- Swap cheddar for Pepper Jack or Swiss for a flavor twist.
- Add-ins like bacon, jalapeños, or mushrooms make great variations.
- To freeze: Freeze unbaked pockets on a tray, then store in freezer bags for up to 2 months.
- To reheat baked pockets: Use oven at 350°F for 10–12 minutes. Avoid microwaving to maintain texture.