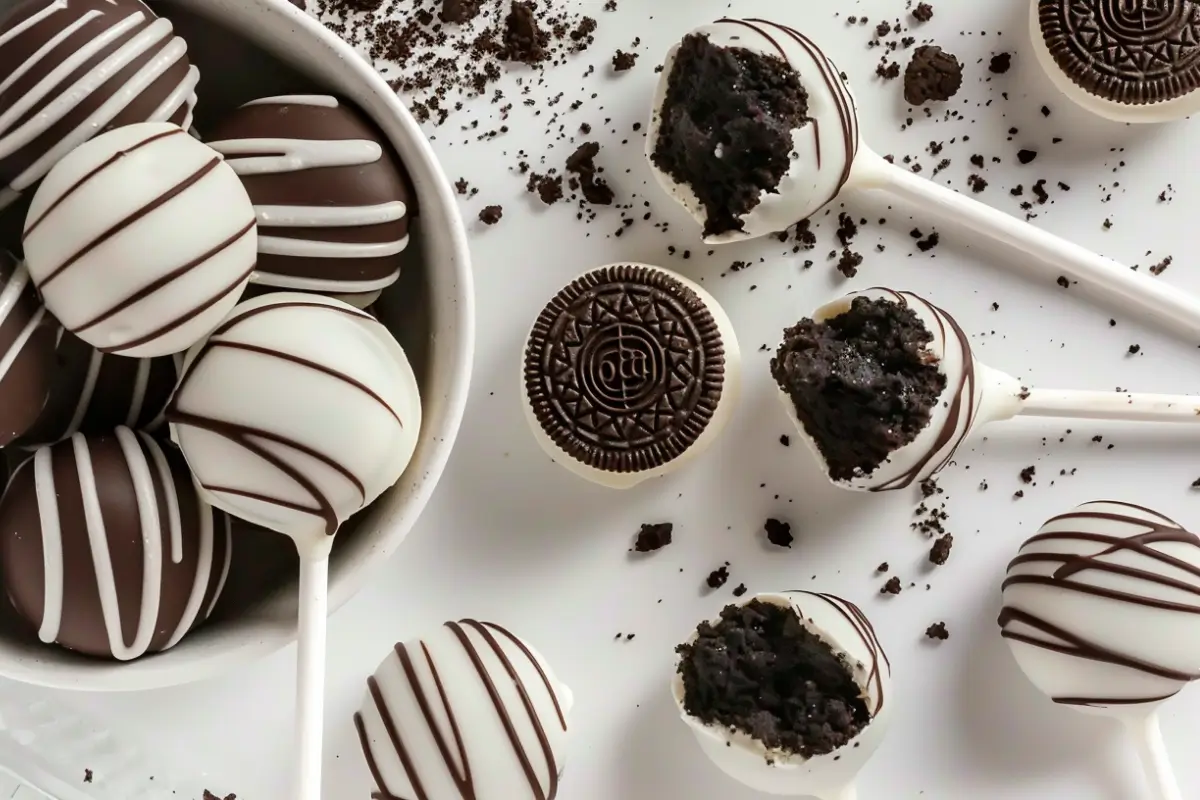
Looking for a show-stopping sweet treat that takes minimal effort but delivers maximum flavor? These No Bake Oreo Cake Pops are the ultimate bite-sized dessert. Whether you’re prepping for a party, craving a late-night snack, or need an easy dessert project with kids, these creamy, chocolatey, Oreo-loaded delights are your go-to.
They require no oven, no advanced skills, and no stress—just a few pantry staples and a sweet tooth. You’ll love how these Oreo cake pops turn out every single time, with a rich, fudgy texture inside and a chocolatey shell outside.
Don’t miss our Mini Peanut Butter Cup Cheesecakes for another no-bake treat that’s big on flavor.
Jump to:
Why You’ll Love This Recipe
Quick and Fun No-Bake Treat for All Ages
No Bake Oreo Cake Pops are perfect when you need a dessert that’s quick, creative, and doesn’t heat up the kitchen. In less than 30 minutes (excluding chill time), you’ll have a tray full of gorgeous cake pops that are guaranteed crowd-pleasers.
Perfect for:
- Birthday parties
- Baby showers
- Holiday platters
- Afternoon snacks
Plus, kids love helping roll and decorate these Oreo cake balls, making them a great family-friendly kitchen activity.
Rich Oreo Flavor with Creamy Texture
These Oreo cake pops are made with finely crushed Oreo cookies and softened cream cheese, forming a dough that’s fudgy, smooth, and completely irresistible. Once dipped in melted chocolate or candy melts, they firm up with a delightful snap. The no bake factor keeps the Oreo flavor bold and intense—just the way we like it.
Compared to traditional cake pops, these No Bake Oreo Cake Pops skip the cake crumbs and frosting mix. That means:
- Less mess
- More flavor
- Shorter prep time
Want more no-bake dessert ideas? Check out our Strawberry Dole Whip for another cool, creamy treat you can whip up fast.
Preparation and Cooking Time
Total Time Breakdown: Prep, Chilling, Decorating
One of the best things about No Bake Oreo Cake Pops is how quickly they come together. Here’s a breakdown so you can plan ahead:
| Task | Estimated Time |
|---|---|
| Crushing Oreos | 5 minutes |
| Mixing and forming balls | 10 minutes |
| Chilling before dipping | 20–30 minutes |
| Dipping and decorating | 15–20 minutes |
| Final set time (optional) | 10–15 minutes |
| Total Time | ~50–70 minutes |
You don’t need to rush, but you also don’t have to commit an entire afternoon. These cake pops can be made in under an hour if you’re focused, making them ideal for last-minute events or spontaneous sweet cravings.
Looking for a similarly quick dessert? Try our Creamy Coffee Cheesecake—no oven needed and packed with rich flavor.
Best Time-Saving Tips for Busy Bakers
If you’re juggling kids, calls, or a chaotic kitchen, these tips will save your sanity:
- Pre-crush the Oreos in bulk and store them in an airtight container.
- Use a small cookie scoop to portion out even-sized balls faster.
- Chill the mix before rolling if it’s too soft to work with.
- Line up dipping tools (skewers or pop sticks, melting chocolate, sprinkles) before you start.
Want to save even more time? Form the Oreo balls a day ahead and store them in the fridge until you’re ready to dip and decorate. That’s time management with a chocolate reward at the end.
Ingredients
Essential Ingredients for No Bake Oreo Cake Pops
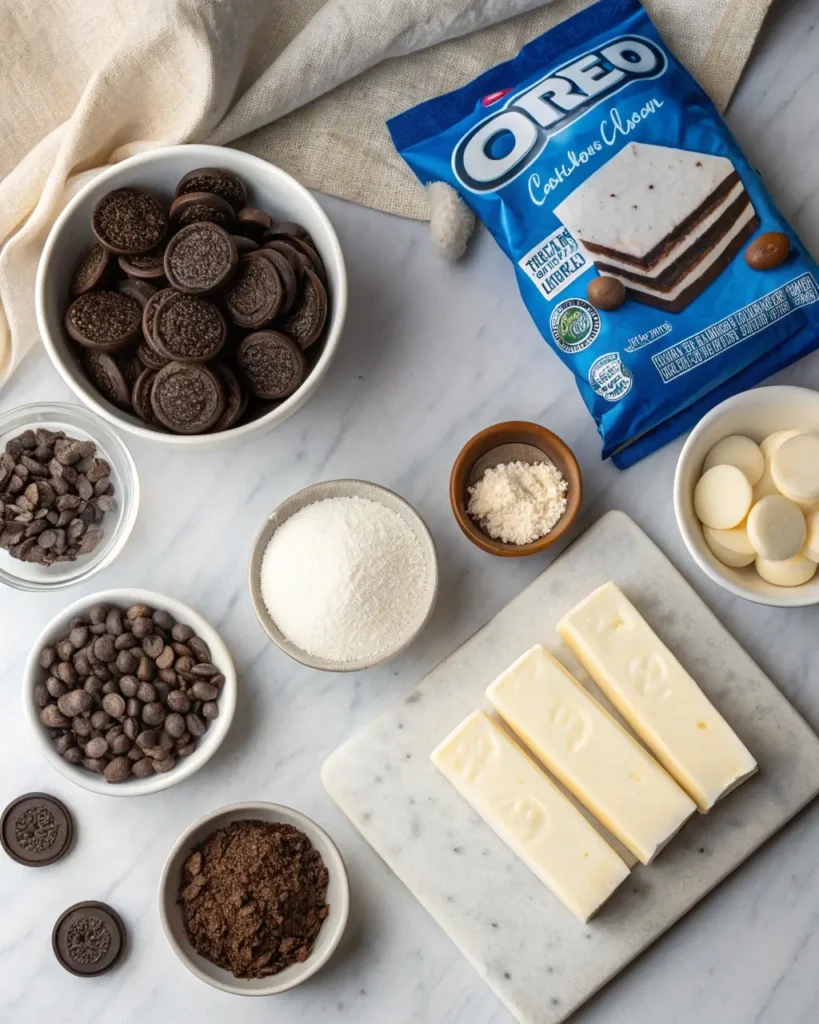
You’ll only need a handful of simple ingredients to make this crowd-pleasing dessert. That’s the beauty of No Bake Oreo Cake Pops—they’re easy to prep, with no fancy items required. Here’s your grocery list:
- 1 package of Oreo cookies (14.3 oz) – classic chocolate preferred, or experiment with flavors like Golden or Mint
- 8 oz cream cheese, softened – full-fat works best for texture
- 10 oz melting chocolate or candy melts – choose dark, milk, or white chocolate depending on preference
- Lollipop sticks or cake pop sticks – you can also use colorful paper straws for a festive twist
- Optional toppings – crushed nuts, sprinkles, mini chocolate chips, cookie crumbs, or drizzle
That’s it! Just 3 main ingredients to make the best no bake Oreo cake pops your family will crave. The optional toppings add flair and texture but aren’t necessary for flavor.
Don’t miss our Homemade Caramel Apples for another sweet snack that’s perfect for dipping and decorating.
Recommended Substitutions and Brands
Running low on something? No problem. Here are trusted substitutes that keep the flavor on point:
| Ingredient | Substitute |
|---|---|
| Oreo cookies | Store-brand sandwich cookies or gluten-free Oreos |
| Cream cheese | Dairy-free cream cheese, mascarpone, or Greek yogurt (for less richness) |
| Melting chocolate | Almond bark, chocolate chips with a tsp of coconut oil |
| Lollipop sticks | Skewers, toothpicks, or paper straws cut in half |
Pro Tip: Use a food processor to crush the cookies into a fine crumb. If you don’t have one, a zip-top bag and a rolling pin will do the job just fine.
These No Bake Oreo Cake Pops don’t just taste amazing—they’re also adaptable. Swap the ingredients based on dietary needs or pantry availability without missing out on that rich Oreo flavor.
Looking for inspiration? Try our Banana Bread with Cake Mix for a quick bake option with pantry staples.
Step-by-Step Instructions
How to Crush and Mix Oreos
- Crush the cookies
- Place the entire package of Oreo cookies (including filling) into a food processor.
- Pulse until you get fine crumbs with no large chunks.
- No food processor? Put the cookies in a zip-top bag and roll over them with a rolling pin.
- Mix with cream cheese
- Transfer the cookie crumbs to a mixing bowl.
- Add the softened cream cheese and mix until fully combined.
- Use a stand mixer or hand mixer for a smooth, sticky dough.
Pro Tip: The dough should be dense but pliable—like soft modeling clay. If it’s too wet, chill it for 10–15 minutes before rolling.
Forming, Chilling, and Decorating Your Cake Pops
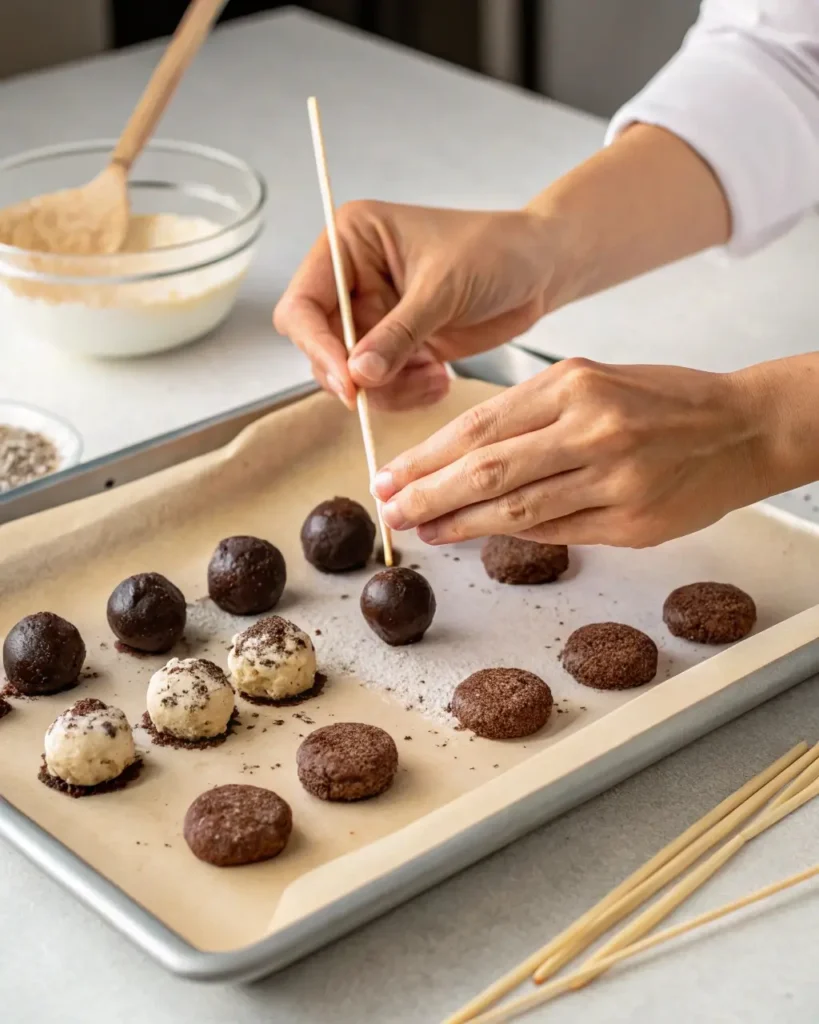
- Roll the balls
- Use a small cookie scoop or tablespoon to portion the mixture.
- Roll into 1-inch balls and place on a parchment-lined baking sheet.
- You should get about 20–24 cake pops from one batch.
- Insert sticks
- Melt a small amount of chocolate.
- Dip each stick tip in melted chocolate, then insert halfway into each ball.
- This helps anchor the stick to the Oreo ball.
- Chill the balls
- Refrigerate for at least 30 minutes or freeze for 15 minutes.
- This helps the pops stay firm during dipping.
- Melt and dip chocolate
- In a microwave-safe bowl, melt your chocolate or candy melts in 30-second intervals, stirring between each.
- Dip each pop into the melted chocolate, turning gently to coat evenly.
- Let excess drip off before setting it upright in a foam block or stand.
- Decorate quickly
- While the chocolate is still wet, add your favorite toppings.
- Let set for 15–20 minutes at room temperature, or pop them in the fridge to speed things up.
For more fun treats, try our Unicorn Cookies—colorful, sparkly, and just as kid-friendly!
How to Serve
Serving Ideas for Parties and Events
Whether you’re throwing a birthday bash, holiday party, or baby shower, No Bake Oreo Cake Pops make a standout addition to your dessert table. Their compact size, fun look, and rich taste are always a hit.
Here are some creative serving ideas:
- Dessert buffet centerpiece: Display the cake pops upright in a foam block or cake pop stand decorated with themed colors or ribbons.
- Individual party favors: Wrap each pop in clear cellophane, tie with a bow, and add a name tag or sticker for a personalized treat.
- Dessert shots: Serve each pop in a mini cup filled with chocolate chips, sprinkles, or mini marshmallows.
- Holiday platter: Mix different coatings—white, dark, and colored candy melts—to match the season or celebration.
Want another dessert that shines at events? Try our Jello Cake Recipes Easy for colorful, crowd-pleasing options.
Presentation Tips: Stands, Sticks, and Toppings
No Bake Oreo Cake Pops aren’t just tasty—they’re also photogenic. Here’s how to elevate their appearance:
- Use paper straws or decorative sticks to match your party theme.
- Drizzle contrasting chocolate over the coating once it sets for a bakery-style touch.
- Dust with edible glitter or luster dust for weddings, showers, or glam nights.
- Crushed Oreos on top make a bold statement and hint at the flavor inside.
- Sprinkle coconut, crushed peppermint, or nuts for textural contrast and flavor layers.
When serving to kids, consider using shorter sticks or even serving them stick-free as cake balls in mini cupcake liners.
These little desserts are fun to make, fun to serve, and even more fun to eat. If you’re looking to round out your dessert table, discover our Muddy Buddies recipe—another easy-to-make, sweet-to-snack treat.

Additional Tips
How to Avoid Common Mistakes Like Falling Pops
Even the easiest no-bake recipes have a few potential pitfalls. Here’s how to sidestep the most common issues when making No Bake Oreo Cake Pops:
- Cake pops falling off the stick?
- Make sure the balls are chilled before dipping.
- Always dip the stick in melted chocolate before inserting—it acts like edible glue.
- Avoid using too much pressure when dipping; a gentle swirl does the trick.
- Cracked coating after dipping?
- This happens when cold cake pops meet hot chocolate. Let them sit at room temp for 5 minutes before dipping.
- Stir chocolate gently to avoid introducing air bubbles that cause cracks.
- Sticky or too-soft dough?
- Chill the dough longer or add extra cookie crumbs to firm it up.
- Always use full-fat cream cheese for better structure.
- Uneven dipping?
- Use a deep, narrow bowl for smoother coverage.
- Tap the stick gently on the edge of the bowl to remove excess coating.
These small adjustments can make a big difference in how your No Bake Oreo Cake Pops look and hold together. Want to perfect your prep game? Check out our tips for How Long to Cook Enchiladas for more kitchen-savvy tricks.
Dipping Secrets and Chocolate Melting Hacks
Working with chocolate can be intimidating, but these hacks make it foolproof:
- Use candy melts if you’re new to chocolate work—they melt smoothly and harden quickly.
- Add 1 tsp coconut oil or vegetable shortening to chocolate chips for a smoother dip.
- Microwave in short bursts (30 seconds), stirring between rounds to avoid scorching.
- Keep chocolate warm by placing the bowl over a pot of warm water (double boiler-style) while working.
You can even divide your melted chocolate and color it with candy coloring gels for a multi-colored effect—great for birthdays or themed celebrations.
Looking for a unique treat with similar dipping technique? Try our Sweet Chili Chicken Rice Bowls—they offer savory balance to your sweet fix.
Recipe Variation
Flavored Versions (Peppermint, Peanut Butter, and More)
Once you’ve nailed the classic No Bake Oreo Cake Pops, you’ll love experimenting with flavors that match any season or celebration. Here are some crowd-pleasing ideas:
- Peppermint Oreo Cake Pops
- Use peppermint-flavored Oreos or add ¼ tsp peppermint extract to the cream cheese mixture.
- Dip in white chocolate and top with crushed candy canes for a festive holiday twist.
- Peanut Butter Oreo Pops
- Mix in 2 tbsp creamy peanut butter with the cream cheese.
- Use Reese’s Pieces or mini chocolate chips as a topping.
- Birthday Cake Oreo Pops
- Use Birthday Cake Oreos and coat in white chocolate with rainbow sprinkles.
- Add a dash of vanilla extract for enhanced sweetness.
- Mocha Oreo Pops
- Add 1 tsp instant espresso powder into the Oreo-cream cheese mixture.
- Dip in dark chocolate and drizzle with a white chocolate zigzag.
These exciting flavors transform your basic no-bake Oreo cake balls into a versatile dessert that fits any occasion.
Want more variation ideas? Explore our Banana Cake Using Yellow Cake Mix—a creative take on classic banana cake.
Dietary Tweaks (Dairy-Free, Low-Sugar)
Need a version that fits specific diets? These tweaks don’t compromise on flavor:
| Dietary Need | Variation Suggestion |
|---|---|
| Dairy-Free | Use dairy-free cream cheese and vegan chocolate |
| Gluten-Free | Use gluten-free Oreo-style cookies |
| Low Sugar | Choose sugar-free cookies and unsweetened chocolate |
Pro Tip: These alternate versions may affect texture slightly, so always chill longer before dipping.
Looking for healthy sweet alternatives? Try our Protein Donuts—packed with protein and flavor, minus the guilt.
Freezing and Storage
Should You Freeze or Refrigerate Before/After Dipping?
A common question for making No Bake Oreo Cake Pops is how and when to chill them. Here’s the breakdown:
- Before Dipping:
- Always chill the Oreo balls for at least 30 minutes in the fridge or 15 minutes in the freezer. This firms them up so they won’t fall off the sticks when dipped in chocolate.
- If your kitchen is warm, a quick freeze helps avoid sticky dough.
- After Dipping:
- Once dipped and decorated, let the pops harden at room temperature for 20 minutes or place them in the fridge to set faster.
- Don’t freeze after dipping unless you’re storing long-term—chocolate can crack due to rapid temperature change.
Proper chilling is one of the secrets behind smooth, crack-free coatings and stable cake pops.
Curious how long to chill or cook other desserts? Check out our Banana Pudding with Chessman Cookies for similar make-ahead storage tips.
Best Containers and Shelf-Life Tips
Once your No Bake Oreo Cake Pops are ready, here’s how to keep them fresh:
| Storage Method | How Long It Lasts | Tips |
|---|---|---|
| Room temperature | 2–3 days | Keep in an airtight container |
| Refrigerated | Up to 1 week | Best for warm climates |
| Frozen (undipped) | Up to 2 months | Wrap each ball in plastic wrap |
| Frozen (dipped) | 3–4 weeks | Store in a single layer in a freezer-safe box |
Pro Tip: Separate layers with parchment paper to avoid sticking or smudging.
When ready to serve frozen pops, let them thaw in the fridge for 4–5 hours. Avoid microwaving—this can melt the coating or make the texture too soft.
Need more make-ahead inspiration? Try our Coffee Cheesecake—another dessert that stores beautifully in the fridge.
Special Equipment
Must-Have Tools: From Sticks to Molds
While No Bake Oreo Cake Pops are easy to make without fancy tools, having the right equipment can elevate your process and results. Here’s what you really need:
- Food Processor or Blender
- For crushing Oreos into a fine crumb. A high-powered blender works in a pinch too.
- Mixing Bowl + Spatula or Hand Mixer
- For combining cookie crumbs and cream cheese thoroughly and evenly.
- Cookie Scoop or Measuring Spoon
- Ensures uniform size and shape, helping pops set and dip more evenly.
- Lollipop or Cake Pop Sticks
- Essential for classic cake pop presentation. Paper straws work as a colorful alternative.
- Baking Sheet + Parchment Paper
- Keeps things clean and makes chilling and dipping hassle-free.
- Microwave-Safe Bowl
- For melting chocolate or candy melts without burning.
These core items are more than enough to create beautiful, evenly shaped No Bake Oreo Cake Pops with less effort and mess.
Need more guidance on prepping like a pro? Don’t miss our Guide to Using a Ninja Air Fryer—perfect for beginners.
Optional Gadgets That Make It Easier
If you’re planning to make cake pops often or for events, these tools are worth the small investment:
| Tool | Benefit |
|---|---|
| Cake pop stand | Keeps dipped pops upright to set |
| Double boiler | Smooth and consistent chocolate melt |
| Candy thermometer | Prevents overheating chocolate |
| Decorating bottles | Easy chocolate drizzle or patterns |
| Silicone molds | Uniform shapes and easier cleanup |
Pro Tip: Silicone molds are ideal for beginners—they help maintain shape and size without cracking during dipping.
Looking to simplify dessert making even further? Try our 3-Ingredient Banana Bread for another low-effort, high-reward favorite.
Frequently Asked Questions
Do you freeze or refrigerate cake pops before dipping?
Yes, it’s best to chill your cake pops before dipping to prevent them from falling apart. You can refrigerate them for 30–60 minutes or place them in the freezer for about 15 minutes. The goal is to firm up the Oreo balls without making them rock-solid, which can cause the chocolate to crack.
For No Bake Oreo Cake Pops, refrigeration works perfectly. Freezing for too long can lead to condensation after dipping, affecting texture and appearance.
Do Oreo Pops need to be refrigerated?
While No Bake Oreo Cake Pops are safe at room temperature for a short time, it’s best to store them in the refrigerator to maintain freshness and prevent the cream cheese from spoiling. Keep them in an airtight container for up to a week. If you’re preparing in advance, undipped pops can be frozen and then dipped fresh before serving.
What can you use instead of cream cheese in Oreo balls?
If you’re out of cream cheese or looking for an alternative, try:
Mascarpone cheese – rich and smooth, slightly sweeter
Greek yogurt – tangy and lower in fat
Nut butters – peanut or almond butter adds a twist
Dairy-free cream cheese – perfect for vegan or lactose-free versions
Note: The texture may vary slightly, but they’ll still work for No Bake Oreo Cake Pops.
What is the secret to dipping cake pops?
The real secret is preparation and chocolate consistency:
Chill the cake pops so they’re firm but not frozen
Dip the stick in melted chocolate before inserting—it acts like glue
Use a deep, narrow bowl for dipping
Tap off excess chocolate by gently rotating the pop
Decorate while still wet so toppings stick
Getting the chocolate just right—smooth, not too thick—is key to coating your Oreo cake pops evenly.
How far in advance should I make cake pops?
You can prepare No Bake Oreo Cake Pops in stages:
Oreo-cream cheese balls: up to 2 days ahead (refrigerated)
Fully dipped cake pops: up to 1 week ahead (in fridge)
Freeze (undipped): up to 2 months
This makes them perfect for planning ahead for parties and events. Just thaw in the fridge before dipping.
Why are my cake pops falling off the stick when I dip them?
This is a common issue and usually comes down to these causes:
Not chilling the pops enough
Inserting sticks without dipping in chocolate first
Dough too soft or warm
Heavy or thick dipping chocolate pulling them down
Fix it by chilling longer, dipping the stick first, and working quickly with smooth, fluid chocolate. These tricks make your No Bake Oreo Cake Pops stable and beautiful.
Conclusion
If you’re craving a rich, chocolatey treat that doesn’t require turning on the oven, these No Bake Oreo Cake Pops deliver every time. With just three core ingredients and endless flavor variations, they’re as easy to make as they are fun to serve. Whether you’re prepping for a party or just want a sweet bite with your coffee, this recipe has you covered.
From troubleshooting tips to flavor twists and storage hacks, we’ve shared everything you need to make flawless Oreo cake pops—even if you’re a beginner. So go ahead and get rolling—you’re just a few steps away from no-bake dessert perfection.
Looking for inspiration? Try our Chocolate Crepe Cake—a rich, layered treat for serious dessert lovers.
PrintNo Bake Oreo Cake Pops

These No Bake Oreo Cake Pops are the ultimate 3-ingredient no-bake dessert—rich, creamy, and dipped in chocolate. Perfect for parties, holidays, or a quick sweet tooth fix.
- Prep Time: 10 minutes
- Total Time: 40 minutes (including chilling)
- Yield: 24 cake pops
- Category: Dessert
- Method: No Bake
- Cuisine: American
- Diet: Vegetarian
Ingredients
- 1 (14.3 oz) package Oreo cookies (classic or flavored)
- 8 oz cream cheese, softened
- 10 oz melting chocolate or candy melts (white, milk, or dark)
- 24 lollipop sticks or cake pop sticks
- Optional toppings: crushed Oreos, sprinkles, crushed peppermint, mini chocolate chips
Instructions
- Crush the Oreos (with filling) in a food processor until fine crumbs form.
- In a mixing bowl, combine the crumbs with softened cream cheese. Mix until a smooth dough forms.
- Roll the mixture into 1-inch balls and place them on a parchment-lined baking sheet.
- Chill in the fridge for 30–60 minutes or freeze for 15 minutes.
- Dip each stick tip in melted chocolate, then insert halfway into each ball.
- Melt chocolate or candy melts in a microwave-safe bowl in 30-second intervals, stirring in between.
- Dip each pop into the melted chocolate, turning to coat evenly.
- Immediately decorate with toppings while the coating is still wet.
- Place upright in a cake pop stand or foam block until chocolate sets (15–20 minutes).
Notes
- Store in an airtight container in the refrigerator for up to 1 week.
- Undipped cake pops can be frozen for up to 2 months.
- For a smoother coating, add 1 tsp coconut oil to the melted chocolate.
- Use gluten-free cookies and dairy-free cream cheese for an allergy-friendly version.