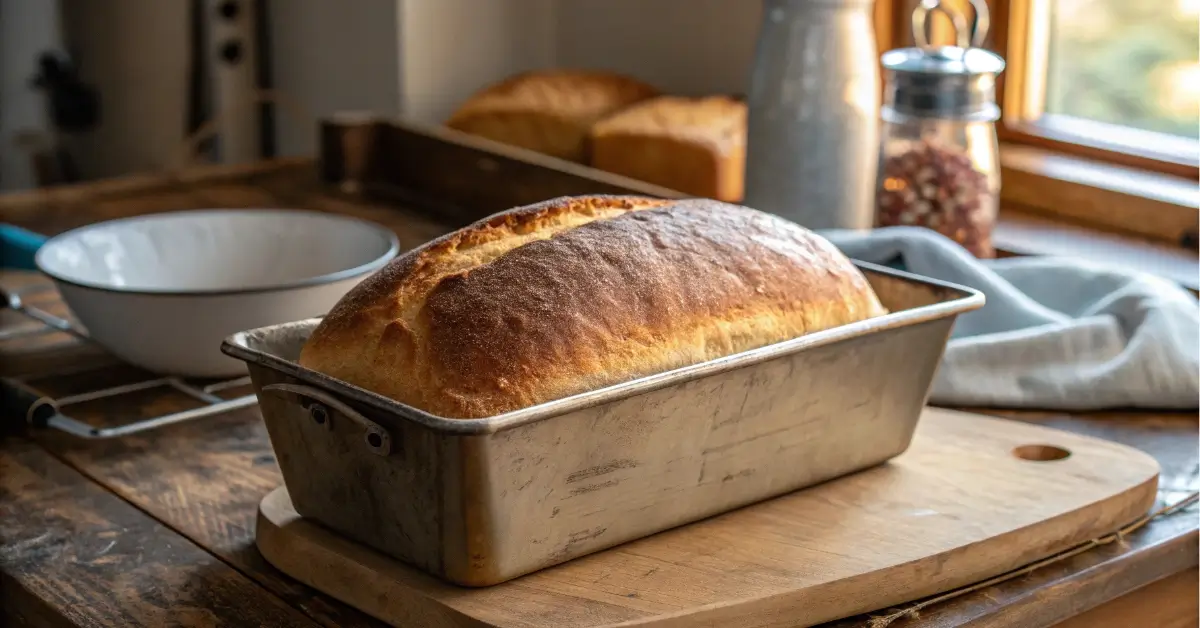
Baking sourdough in a loaf pan is a game-changer for both beginner and seasoned bakers who crave consistency, simplicity, and sliceable perfection. Whether you’re short on specialty bakeware or just love that uniform sandwich shape, this method delivers. In this ultimate guide, we’ll dive deep into the tools, techniques, and timing you need to master pan baking like a pro.
From understanding the science of hydration and fermentation to avoiding common starter mistakes, we’ll show you how to achieve bakery-quality sourdough using just a simple loaf pan. Plus, we’ll answer the web’s most asked questions and share top tips to fix those pesky baking fails. Looking for inspiration? Try this comforting beef short ribs oven-baked recipe while your dough ferments!
Why Bake Sourdough in a Loaf Pan?
Benefits of Baking Sourdough in a Loaf Pan
Using a loaf pan when baking sourdough offers multiple advantages, especially for those looking for:
- Uniform Shape: A loaf pan ensures your bread comes out with a nice rectangular shape, perfect for slicing.
- Height Control: It helps the dough rise upward, not outward, leading to taller, denser loaves.
- Ease of Handling: No need for fancy scoring, Dutch ovens, or bannetons.
- Beginner-Friendly: It’s ideal for new bakers who want reliable results without overcomplicating the process.
Loaf pans also make sourdough feel more familiar—like the classic sandwich loaf most of us grew up with. If you’re looking for a more traditional bread experience with that tangy sourdough flavor, this method is your go-to.
How It Compares to Traditional Dutch Oven Baking
While Dutch ovens trap steam for an artisan-style crust, loaf pans offer:
| Feature | Loaf Pan | Dutch Oven |
|---|---|---|
| Crust Texture | Softer, golden-brown | Thick, crackly, rustic |
| Crumb Style | Denser, more uniform | Open, airy crumb |
| Best For | Sandwiches, toast, daily use | Boules, rustic presentation |
| Skill Level Needed | Beginner | Intermediate to Advanced |
| Steam Environment | Optional, needs pan of water | Built-in steam trapping |
If you’re aiming for simplicity and everyday practicality, baking sourdough in a loaf pan is unmatched. Not to mention, you can double your batch and bake two loaves side-by-side—efficient and family-friendly.
Check out this twist on protein-packed cookies if you’re planning a baking day—dessert while your sourdough cools sounds like a win, right?
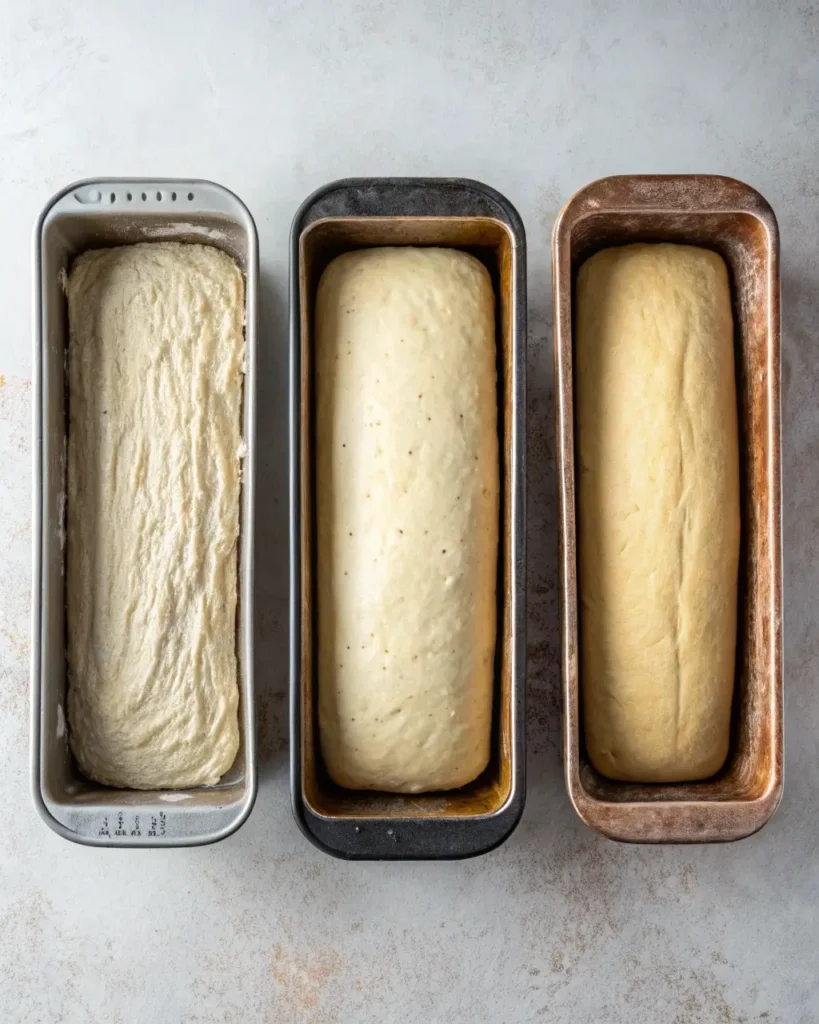
Choosing the Right Loaf Pan for Sourdough
Material Matters: Glass, Ceramic, or Metal?
Choosing the right pan makes a huge difference in how your sourdough bakes—texture, rise, and even taste. Here’s a breakdown of common loaf pan materials and how they affect your final bake:
| Pan Material | Heat Conductivity | Crust Result | Notes |
|---|---|---|---|
| Metal (Aluminum/Steel) | Excellent | Crisp, even | Best for consistent browning and rise |
| Glass | Moderate | Softer | Retains heat, may brown slower |
| Ceramic | Low | Tender, moist | Great for gentle bakes, slower heating |
Metal pans are often the best choice when baking sourdough in a loaf pan because they heat quickly and promote a stronger rise with a nicely browned crust. If you’re after a firm base and classic toastable texture, metal’s your winner.
Glass pans give you a clear view of your bake, but they hold heat longer. That means your crust may brown slower, and you’ll want to reduce the oven temp by 25°F to prevent overbaking the sides.
Ceramic pans, while beautiful and rustic, are better for softer loaves and lower-temp bakes. They’re ideal if you like a moist interior with less crust crackle.
Loaf Pan Sizes and Their Impact on Your Dough Rise
Not all loaf pans are created equal—and yes, size matters.
| Pan Size | Dough Capacity | Ideal For |
|---|---|---|
| 8.5″ x 4.5″ | 500–550g dough | Compact loaves, denser crumb |
| 9″ x 5″ | 600–650g dough | Most common sourdough size |
| 10″ x 5″ or longer | 700g+ dough | Large family loaves or higher hydration doughs |
Too small, and your dough may overflow or compress and turn gummy inside.
Too big, and your loaf might flatten, especially if your sourdough isn’t strong enough to rise on its own.
To find your sweet spot, weigh your dough before the final proof and match it to the pan size above. Pro tip: line your pan with parchment paper to prevent sticking—especially useful with high-hydration doughs.
Also, darker pans tend to brown the crust faster. If you’re using a darker pan, consider reducing your baking temperature slightly or tenting with foil partway through.
Preparing Your Dough for the Loaf Pan
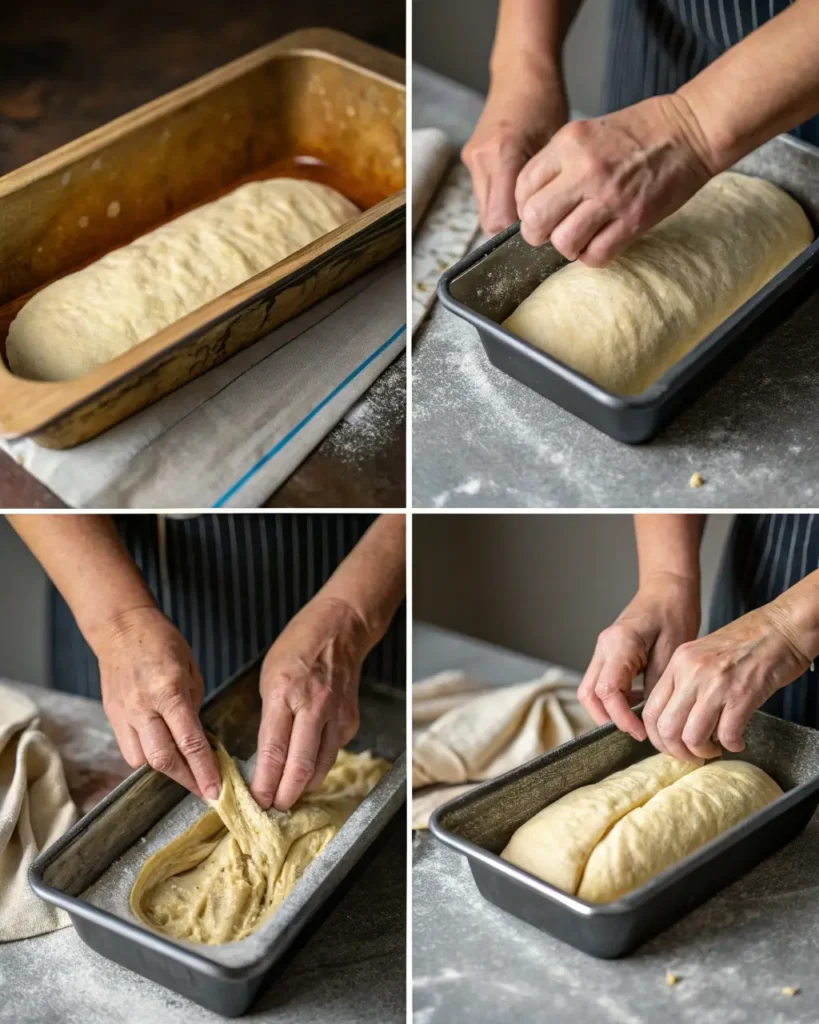
How to Shape Sourdough for a Pan Bake
Shaping your sourdough for a loaf pan is not the same as shaping for a boule or batard. For the best rise, texture, and structure, follow these simple steps:
- Pre-shape your dough into a loose rectangle after bulk fermentation. Let it rest uncovered for 20–30 minutes.
- Tighten the shape by folding one side in, then the other (like a letter). Roll from the top down, creating surface tension.
- Seal the seam at the bottom and gently place the dough, seam-side down, into the greased or lined loaf pan.
- Optional: Lightly oil the top and cover with a damp towel or plastic wrap during the final proof to avoid drying.
Tip: Avoid flouring the shaping surface too much—it prevents tension and causes the dough to slide rather than stretch. Surface tension is key for a tall, proud loaf.
Looking for a complete comfort meal to pair with your fresh sourdough? Don’t miss our Beef Short Ribs Oven-Baked Recipe—it’s the perfect match for a slice of homemade bread.
Folding Technique for Better Structure and Height
Folding helps develop gluten strength and gives your dough structure—especially crucial when baking in a loaf pan, where upward strength is needed.
Here’s a basic fold technique you can do during bulk fermentation (usually done 2–3 times):
- Stretch the top edge of the dough and fold it over to the center.
- Repeat with the bottom edge, folding it over the top layer.
- Do the same with the left and right sides.
- Flip the dough over and let it rest.
Each fold strengthens the dough and gives it more resistance to spreading—key when you want a clean, domed top in the pan. If your loaf spreads wide instead of rising tall, you probably skipped folding or didn’t shape with enough tension.
Using high-hydration dough? Increase folds to 3–4 sets during bulk to help it support itself. This is especially helpful for larger loaf pans or more complex sourdough recipes.
Understanding Hydration and Fermentation for Pan Baking
Why Hydration Levels Affect Loaf Pan Results
Hydration—the ratio of water to flour in your sourdough—has a major impact on how your bread bakes in a loaf pan. In simpler terms: more water = softer dough = more rise challenges.
| Hydration Level | Description | Loaf Pan Outcome |
|---|---|---|
| 65–68% | Low to medium | Easy to shape, structured crumb |
| 70–75% | Medium-high | Open crumb, may spread in pan |
| 75–80%+ | High hydration | Requires folds, support, smaller pans |
Low to medium hydration doughs are more forgiving. They’re easier to handle, rise more predictably in the pan, and rarely spill over.
High hydration doughs, while giving you that beautiful artisan-style open crumb, can be too slack for a loaf pan without proper folding and shaping. You might end up with a flat, gummy loaf unless you reinforce structure through multiple stretch and folds during bulk fermentation.
Want that perfect sandwich loaf texture? Stick to a hydration between 65%–70% when baking sourdough in a loaf pan.
How Long Should Sourdough Ferment in a Pan?
Once your dough is shaped and placed in the loaf pan, final proofing becomes crucial. Here’s how to time it:
| Proofing Method | Time Range | Environment |
|---|---|---|
| Room Temperature | 2–4 hours | 70–75°F |
| Cold Fermentation | 8–12 hours | Refrigerator (38–42°F) |
At room temperature, watch for the dough to rise about 1 inch above the rim of the pan (or roughly double in size). If it’s too warm, reduce proof time to prevent over-proofing.
In the fridge, cold-proofing overnight slows fermentation, deepens flavor, and makes the dough easier to score and bake in the morning. Be sure to bake straight from the fridge for better oven spring.
To test if your dough is ready, use the poke test: lightly press a floured finger into the dough. If it springs back slowly but leaves a slight indentation, it’s ready to bake.
Don’t miss our healthy protein cookie recipe to snack on while your dough does its thing!
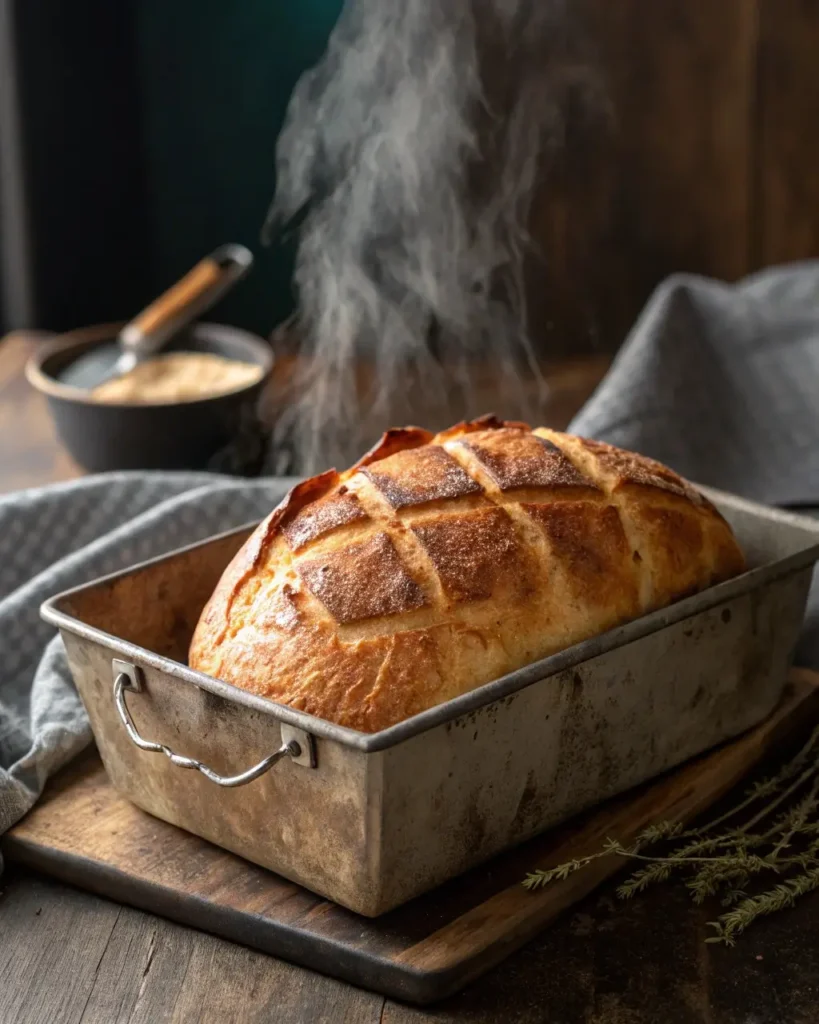
How to Bake Sourdough in a Loaf Pan
Step-by-Step Baking Instructions
Now that your dough is shaped and proofed, it’s time to bake. Here’s a simple, repeatable process to get golden, crusty sourdough every time—right from a loaf pan:
1. Preheat Your Oven:
Crank up your oven to 425°F (218°C) at least 30 minutes before baking. If you want a crisper crust, place a metal pan of water on the bottom rack to create steam.
2. Score Your Dough:
Use a razor blade or sharp knife to slash the top of the dough about ½ inch deep. This controls the expansion and helps prevent blowouts.
3. Place the Loaf Pan on the Middle Rack:
Bake uncovered for 35–45 minutes. At the 30-minute mark, check the crust color. If it’s browning too fast, tent loosely with foil.
4. Check for Doneness:
Internal temperature should be around 200–205°F (93–96°C). Tap the bottom of the loaf (after removing from pan)—it should sound hollow.
5. Cool Completely:
Let the loaf cool on a wire rack for at least 1 hour before slicing. Cutting too soon can result in a gummy crumb.
Pro Tip: If your oven runs hot, reduce the temperature to 400°F after the first 15 minutes to prevent burning the crust.
Temperature and Time Settings for Even Crust & Crumb
Consistency is key when baking sourdough in a loaf pan. Here’s a quick reference:
| Bake Setting | Temp (°F) | Time | Result |
|---|---|---|---|
| Standard Bake | 425°F | 40 min | Golden crust, fully baked inside |
| Steam Bake | 425°F | 35–40 min | Shinier crust, moist crumb |
| Convection Oven | 400°F | 30–35 min | Even baking, less browning |
Want a thicker crust? Try baking the loaf directly on the oven rack (after removing it from the pan) for the last 5–7 minutes.
Baking sourdough in a loaf pan gives you more control, especially if you’re still perfecting your starter or hydration levels. Plus, it’s family-friendly and easy to store.
Troubleshooting Sourdough in Loaf Pans
Common Issues (Dense Texture, Gummy Crumb, Overproofing)
Even with the best prep, sourdough can sometimes flop. Here’s how to identify—and fix—the most common problems when baking sourdough in a loaf pan:
1. Dense Texture
- Cause: Underproofing, low hydration, or inactive starter
- Fix: Extend bulk fermentation by 1–2 hours. Ensure your starter is bubbly and doubles in 4–6 hours. Consider increasing hydration slightly (aim for 68–70%).
2. Gummy Crumb
- Cause: Cutting too soon, too much moisture, underbaking
- Fix: Always let the loaf cool for at least 1 hour before slicing. Use a thermometer to confirm the internal temperature is above 200°F. For high hydration doughs, increase baking time by 5–10 minutes.
3. Overproofed Dough
- Cause: Proofing too long, especially at warm temps
- Fix: Use the poke test. If dough deflates when touched, it’s overproofed. Next time, reduce proof time by 30–45 minutes or refrigerate the dough.
4. Collapsed Loaf in the Oven
- Cause: Weak gluten structure or high hydration with no support
- Fix: Use smaller loaf pans for high hydration doughs and add extra folds during bulk fermentation to build strength.
5. Pale Crust
- Cause: Low oven temp, poor steam, or light-colored pan
- Fix: Preheat oven fully, bake at 425°F, and consider using a darker metal loaf pan. Add a water pan to help the crust develop.
How to Fix Flat or Underbaked Sourdough Loaves
If your sourdough came out flat, here’s what to do:
- Check the strength of your starter. A weak starter = weak rise.
- Revisit your folding technique. At least 2–3 folds during bulk fermentation is a must.
- Use a smaller pan. The same dough will rise higher in an 8.5″ x 4.5″ pan vs. a 9″ x 5″ pan.
If your loaf is underbaked inside, but crusty outside:
- Reduce the oven temp slightly (try 400°F) and bake longer.
- Use an instant-read thermometer for accuracy—aim for 200–205°F in the center.
- Let the loaf sit in the turned-off oven (door ajar) for 5–10 mins to dry the crumb.
Baking isn’t about perfection—it’s about learning from the process. And every mistake is a step closer to mastering sourdough in a loaf pan.
Types of Pans for Sourdough Baking
Loaf Pan vs. Bread Pan: What’s the Difference?
Let’s clear this up—loaf pan and bread pan are often used interchangeably, but there’s a subtle difference, especially when baking sourdough.
| Pan Type | Common Dimensions | Typical Use | Best For |
|---|---|---|---|
| Loaf Pan | 8.5”x4.5” or 9”x5” | Quick breads, yeast loaves | Uniform sourdough shape |
| Bread Pan | Wider or deeper | Commercial loaves, sandwich bread | Bulk baking |
A loaf pan tends to be more compact, which supports a higher rise and is ideal for sourdough recipes up to 650g of dough. These pans help dough rise vertically and are perfect for everyday home bakers.
Bread pans, especially the wider commercial styles, are built for volume and even browning. They’re great if you’re doubling your batch or want a longer, thinner slice—think sub rolls or Texas toast.
If your goal is a classic sourdough sandwich loaf, stick with a 9” x 5” loaf pan made from metal or cast iron for best results.
Dutch Oven, Cast Iron, and Specialty Sourdough Pans
If you’re ready to explore beyond loaf pans, here are a few alternatives used in the sourdough world:
| Bakeware Type | Pros | Cons |
|---|---|---|
| Dutch Oven | Traps steam, artisan crust, open crumb | Requires preheating, round shape |
| Cast Iron Loaf Pan | Holds heat well, great crust | Heavy, can overbake if not monitored |
| Pullman Pan (with lid) | Straight sides, soft top | Less oven spring, not ideal for crust lovers |
| Glass Loaf Pan | See-through, easy to monitor | Retains heat, risk of burning base |
| Ceramic Pan | Even baking, gentle heat | Slower rise, crust stays soft |
While Dutch ovens are amazing for artisan-style loaves, they’re not ideal for sandwich-style baking. For clean slices and structure, loaf pans win hands down. Looking for a hybrid? A cast iron loaf pan gives you the best of both worlds—heat retention and structure.
Discover great ideas like our Cookies and Cream Protein Cookies if you’re baking with kids while waiting on that perfect crust.
Storing and Serving Sourdough Baked in a Loaf Pan
Best Practices to Keep Your Loaf Fresh Longer
There’s nothing worse than putting time into baking sourdough only to have it go stale the next day. Here’s how to store sourdough baked in a loaf pan for maximum freshness and taste:
✅ Short-Term Storage (1–2 Days):
- Wrap the completely cooled loaf in a clean cotton or linen towel and store it in a bread box or paper bag at room temperature.
- Avoid plastic, as it traps moisture and causes the crust to soften or mold faster.
✅ Medium-Term Storage (3–5 Days):
- Place the loaf in a zippered freezer bag or wrap it in foil, then put it in the fridge. It may lose some crust crispness but will stay safe and edible.
- For better flavor retention, slice it first and toast as needed.
✅ Long-Term Storage (1–2 Months):
- Freeze individual slices with parchment paper between them in a freezer-safe bag. To thaw, just pop a slice in the toaster or let it rest at room temperature for 20 minutes.
Avoid refrigerating unsliced sourdough unless it’s very humid in your kitchen—the fridge dries out bread faster than air.
Don’t miss our comfort food recipes like slow-cooked beef ribs to pair with your fresh sourdough slices.
Creative Ways to Slice and Serve Sourdough
Sourdough from a loaf pan is ideal for slicing cleanly and serving in a variety of fun, practical ways:
🥪 For Sandwiches:
- Let the loaf cool fully before slicing. Use a serrated bread knife for uniform cuts.
- For grilled cheese, slice about ½ inch thick. For deli sandwiches, go thinner.
🍞 For Toast:
- Slice and freeze—then pop slices straight into the toaster. Sourdough handles freezing and reheating like a champ.
🧄 For Garlic Bread:
- Cut into thick slices, rub with garlic, and broil with butter or olive oil for a quick side dish.
🧊 For Croutons or Bread Pudding:
- Use stale ends or leftover slices. Cube, season, and bake for croutons. Or soak in egg and milk for a savory or sweet bake.
Whether you’re prepping breakfast, packing lunch, or whipping up dinner, sourdough from a loaf pan brings that rustic charm with everyday practicality.
FAQs About Sourdough in Loaf Pans
Can sourdough be baked in a loaf pan?
Yes, absolutely! Sourdough can be baked in a loaf pan with excellent results. It’s a great alternative to Dutch oven baking, especially if you prefer a uniform shape, easier slicing, and a crust that’s softer and more sandwich-friendly. The key is using the right hydration, shaping techniques, and a suitable pan size to encourage a strong rise.
What is the biggest mistake you can make with your sourdough starter?
The most common mistake is not feeding your starter consistently or accurately. An underfed or neglected starter becomes weak and can’t leaven your bread properly, leading to flat, dense loaves. Other errors include using chlorinated water, feeding with the wrong flour, or baking with it too soon after feeding. A healthy starter should double in size within 4–6 hours at room temperature.
What is the best container to cook sourdough in?
It depends on the desired result. For artisan-style crusty loaves, a Dutch oven is king—it traps steam and encourages a beautiful rise and blistered crust. But for soft, structured loaves that are easy to slice and store, a metal loaf pan is often the best choice. It delivers even heat and promotes vertical rise, perfect for sandwich-style sourdough.
What type of pan is best for sourdough bread?
For pan baking, a 9” x 5” nonstick or metal loaf pan is ideal. It supports the dough as it rises and helps distribute heat evenly. If you want an artisan look with a crispy crust, go for a cast iron or enameled Dutch oven. For softer crusts and a more uniform shape, loaf pans are unbeatable.
What is the difference between a bread pan and a loaf pan?
While both terms are often used interchangeably, a loaf pan typically refers to a compact, rectangular pan used in home baking (like for banana bread or sandwich loaves). A bread pan can sometimes refer to larger, commercial baking pans used in bakeries. For home sourdough baking, they’re generally the same—but always check dimensions before baking!
How do you fold sourdough for a loaf pan?
Folding sourdough for a loaf pan involves stretch-and-folds during bulk fermentation and a final shaping before it hits the pan. Stretch one side over to the center, then fold the opposite side. Repeat top and bottom. Let it rest seam-side down. For shaping, roll the dough tightly into a log and pinch the seam closed before placing it in the pan. Folding strengthens gluten and builds the structure needed for the dough to rise tall in the pan.
Conclusion: Baking Sourdough in a Loaf Pan is Practical, Simple, and Delicious
If you’ve been hesitant to try baking sourdough in a loaf pan, now’s the perfect time to get started. With the right hydration, shaping method, and pan choice, you can enjoy golden, evenly baked sourdough loaves that are soft inside, structured outside, and perfect for slicing.
Whether you’re after daily sandwich bread or want a reliable alternative to the artisan-style boule, a loaf pan delivers the results without the fuss. It’s time to embrace this beginner-friendly, family-loved baking method—and your sourdough game will never be the same.
Don’t miss our slow-cooked beef rib recipe or Cookies and Cream Protein Cookies to complete your next bake day with a little extra flavor!
Sourdough in Loaf Pan
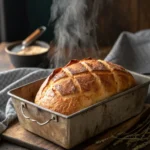
This easy-to-follow recipe for sourdough sandwich bread uses a loaf pan to create a perfectly structured loaf with a soft crumb and thin crust. Ideal for sandwiches, this bread is full of the tangy flavor and health benefits of naturally fermented sourdough.
- Prep Time: 6 hours
- Cook Time: 40 minutes
- Total Time: 6 hours 40 minutes
- Yield: 1 standard loaf
- Category: Bread
- Method: Baking
- Cuisine: American
- Diet: Vegetarian
Ingredients
- 500g bread flour
- 350g water
- 100g active sourdough starter
- 10g salt
- Optional: 10g sugar or honey for a touch of sweetness
Instructions
Mixing the Dough:
Combine flour, water, and sourdough starter in a large mixing bowl. Let it rest for 30 minutes (autolyse).Adding Salt:
Add salt and mix until fully incorporated. If desired, mix in sugar or honey for a hint of sweetness.Bulk Fermentation:
Cover the bowl with a damp towel and let it rise in a warm place for 4–6 hours, folding the dough every 30 minutes.Shaping the Dough:
Transfer the risen dough to a floured surface, shape it into a loaf, and place it seam-side down into a greased loaf pan.Final Proofing:
Allow the dough to rise for 1–2 hours until it’s slightly above the pan’s rim.Baking:
Preheat the oven to 425°F (220°C). Bake for 35–40 minutes until golden brown and the loaf sounds hollow when tapped.
Notes
- Use a kitchen scale for precise measurements.
- Grease the loaf pan to prevent sticking.
- For added texture and flavor, experiment with seeds, nuts, or dried herbs.
- To prevent a thick crust, place a tray of water in the oven for the first 15 minutes of baking to create steam.